
Smart Air Quality Monitoring using an IKEA Vindriktning with ESP8266 & BME680
A Step-by-Step Guide
Effective insulation is key in modern homes, offering comfort and energy efficiency. However, it often comes with a need for better ventilation to maintain a healthy air quality. In this guide, we’re focusing on an innovative, cost-effective way to enhance your home’s air quality using some clever technology. We’ll show you how to combine the IKEA Vindriktning air quality monitor with an ESP8266 microcontroller and a BME680 Volatile Organic Compounds (VOC) sensor (which allows CO2 levels to be estimated). With this IKEA-hack, you’ll be able to make informed decisions about when to open windows, increase ventilation, or change filters, all based on accurate data. Plus, it integrates smoothly with smart home systems like Home Assistant using ESPHome.
In this guide, we’re diving deep into every nook and cranny of this project. We’ll start from the ground up with the electronics, smoothly sail through the integration with Home Assistant (HA), and even sprinkle in some savvy tips on how to interpret the results.
What you need?
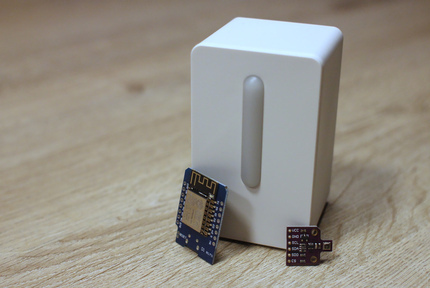
While this concept of enhancing the IKEA Vindriktning isn’t exactly breaking new ground – there’s already a plethora of information and various hacks out there – the advantage of being late to the party is that I can cherry-pick the best solution for me. After some digging, I settled on the Wemos D1 Mini Pro. It’s a nifty little microcontroller based on the ESP8266. What makes it a gem for this project is its compact size, perfect for fitting snugly inside the Vindriktning case, not to mention its wallet-friendly price. Then there’s the Bosch BME680. This nifty little sensor brings you temperature, barometric pressure, and moisture readings in a very small package, but its real star feature is the VOC sensor. And the best part? It seamlessly connects to the ESP8266 using a simple four-wire I2C setup, making integration a breeze.
-
IKEA Vindriktning Air Quality Monitor: Don’t forget, it needs its own power supply. So, grab a USB-C cable and a compatible power adapter (these aren’t included with the Vindriktning, so make sure you have these handy).
-
Wemos D1 Mini Pro Microcontroller Board: This is the brains of the operation. It’s compact, efficient, and just what you need for this project.
-
Bosch BME680 Sensor Board: This is your go-to for monitoring temperature, pressure, humidity, and VOC levels. It’s a crucial component for getting those detailed air quality readings.
-
Wires: I repurposed some from an old USB cable. It’s a great way to recycle and save a few bucks!
-
USB Cable for the D1 Mini Pro: Now, this depends on the version of your D1 Mini Pro. Some use micro-USB, others USB-C. Make sure to check which one you need!
-
Soldering Gear: Arm yourself with a soldering iron that has temperature control. Don’t forget the solder, flux, and other essentials for a smooth soldering experience.
The overall cost of this project can vary quite a bit depending on where you pick up your components. For me, a bit of savvy shopping on AliExpress paid off – I scored the microcontroller and sensor for about $3 and $5, respectively. Toss in the IKEA Vindriktning at $12, and you’re looking at a total spend of roughly $20-25. Now, here’s the kicker: that’s about half the price of the most affordable smart air quality sensor I could find on the market!
Connecting the ESP8266 to the BME680
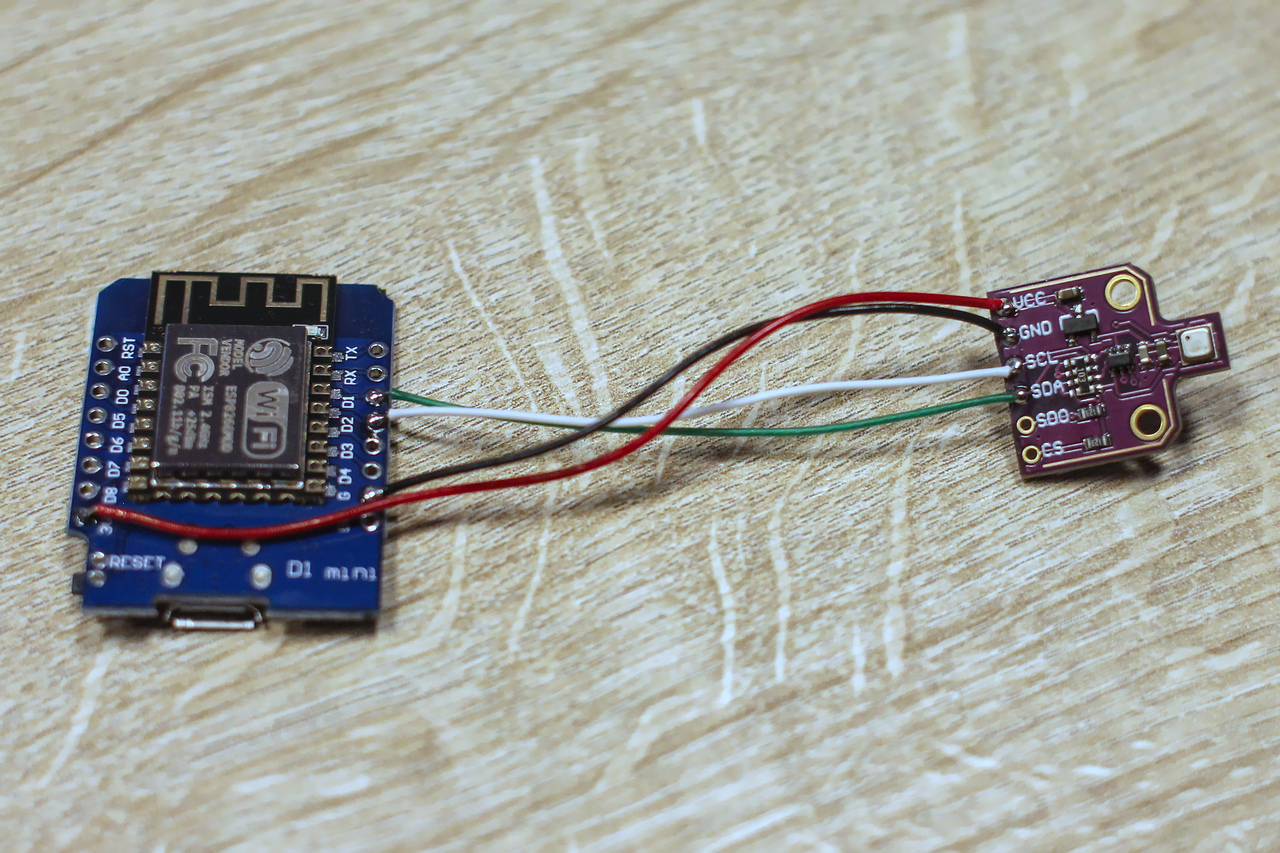
Hooking up the BME680 sensor board to our microcontroller is a pretty straightforward task, thanks to the I2C interface. This nifty little protocol means we only need four wires to make the connection. Here’s how I set it up:
| D1 Mini Pin | BME680 Pin | Cable Color |
|---|---|---|
| 3V3 | VCC | Red |
| G | GND | Black |
| D1 | SDA | Green |
| D2 | SCL | White |
A piece of advice: aim for short and tidy wiring. In fact, I ended up revising my initial setup to shorten the wires after taking the photo below. It’s all about keeping things organized and efficient inside the case to avoid restricting airflow.
Flashing ESPHOME
Now’s the perfect time, while your ESP8266 is still accessible, to get ESPHome up and running on your Wemos D1 Mini Pro. Setting this up is a breeze, especially if you’re using Home Assistant. Just hop over to their getting started guide, and hit the Show Add-on in My HA button. You’ll be prompted to confirm your HA instance’s URL before clicking Open link. Once there, installing and configuring ESPHome is straightforward. Oh, and don’t forget to check the Start on Boot and Watchdog options. They’re lifesavers for making sure ESPHome reboots as needed.
Now, connect that D1 Mini to your computer using a USB cable. Then, make your way over to Home Assistant and look for ESPHome in the sidebar. Click on NEW DEVICE, and give your device a name that makes sense for you; I went with ‘Living Room Sensor’. From there, just follow the on-screen instructions. When it asks, select the COM port that matches your device (for me, it was COM6). This is going to flash a basic firmware onto your ESP8266. No hiccups? Perfect! If all went smoothly here, feel free to skip the next section.
Manual setting up and flashing the ESP8266
This didn’t work for me though (maybe because my Home Assistant is running on an ancient Raspberry Pi). If you hit a snag like I did, it’s likely that the firmware isn’t compiling right on your Home Assistant device. Fortunately, this can be done manually. Proceed with a manual installation of ESPHome. This got the command line version of ESPHome up and running on my computer.
Now, to flash your device, create a configuration file (or use the one below), and get ready to use the two commands below. These will compile new firmware with your configuration and send it straight to your device. Heads up: the first upload has to be done via USB. But once you’ve done that, Over-the-Air updates can be used!
esphome compile living-room-sensor.yaml
esphome upload living-room-sensor.yaml
Note: In case you wish to add certain items, like the WiFi network and password as a secret, make sure to define those
in a file secrets.yaml in the same folder as the configuration file you are compiling and uploading.
Once your device is successfully running the new firmware, the next step is to add it to Home Assistant. In the ESPHome section, click NEW DEVICE and enter the name you assigned in the yaml file. When asked, connect using the COM port. A quick heads-up: you can skip the steps involving firmware compilation and uploading, as these aren’t necessary now.
There’s just one more detail to attend to. It’s important to ensure that the yaml file on your device matches the one in Home Assistant’s ESPHome add-on. To do this, go to the ESPHome section, select Edit on the device you just worked on, replace the yaml file content with your updated version, and then hit Save. This step is required each time you update the configuration, ensuring everything stays in sync.
Connecting the IKEA Vindriktning to the D1 Mini
The IKEA Vindriktning seems like it was almost made with DIY enthusiasts in mind. One look at the PCB, and you’ll notice the clearly labeled test pads, which are a hacker’s dream. For our project, we need to focus on three critical connections: +5V, GND, and REST. These will not only power up the ESP8266 but also transfer readings from the Vindriktning’s PM1006 sensor to our microcontroller.
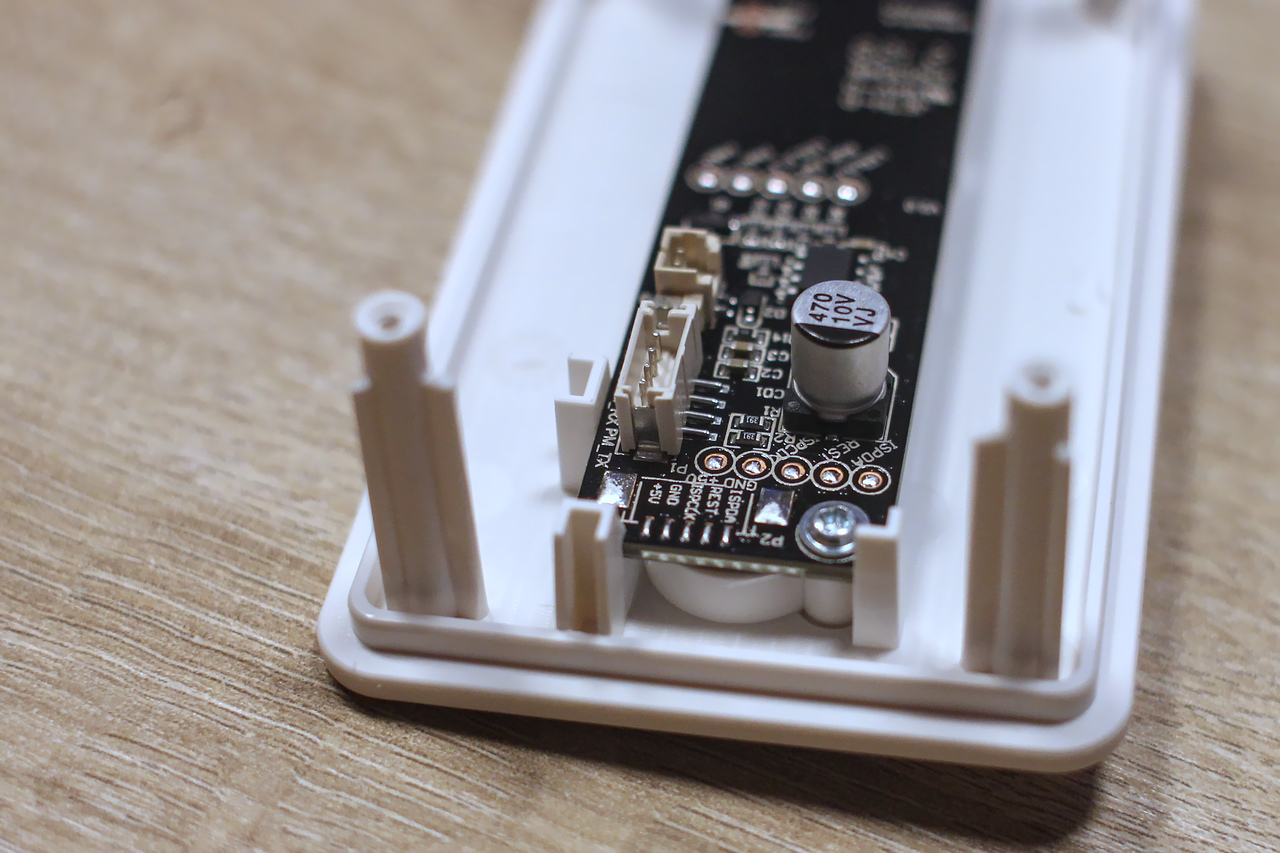
Here is how I wired things up:
| D1 Mini Pin | IKEA Vindriktning | Cable Color |
|---|---|---|
| 5V | +5V | Red |
| G | GND | Black |
| D7 | REST | Green |
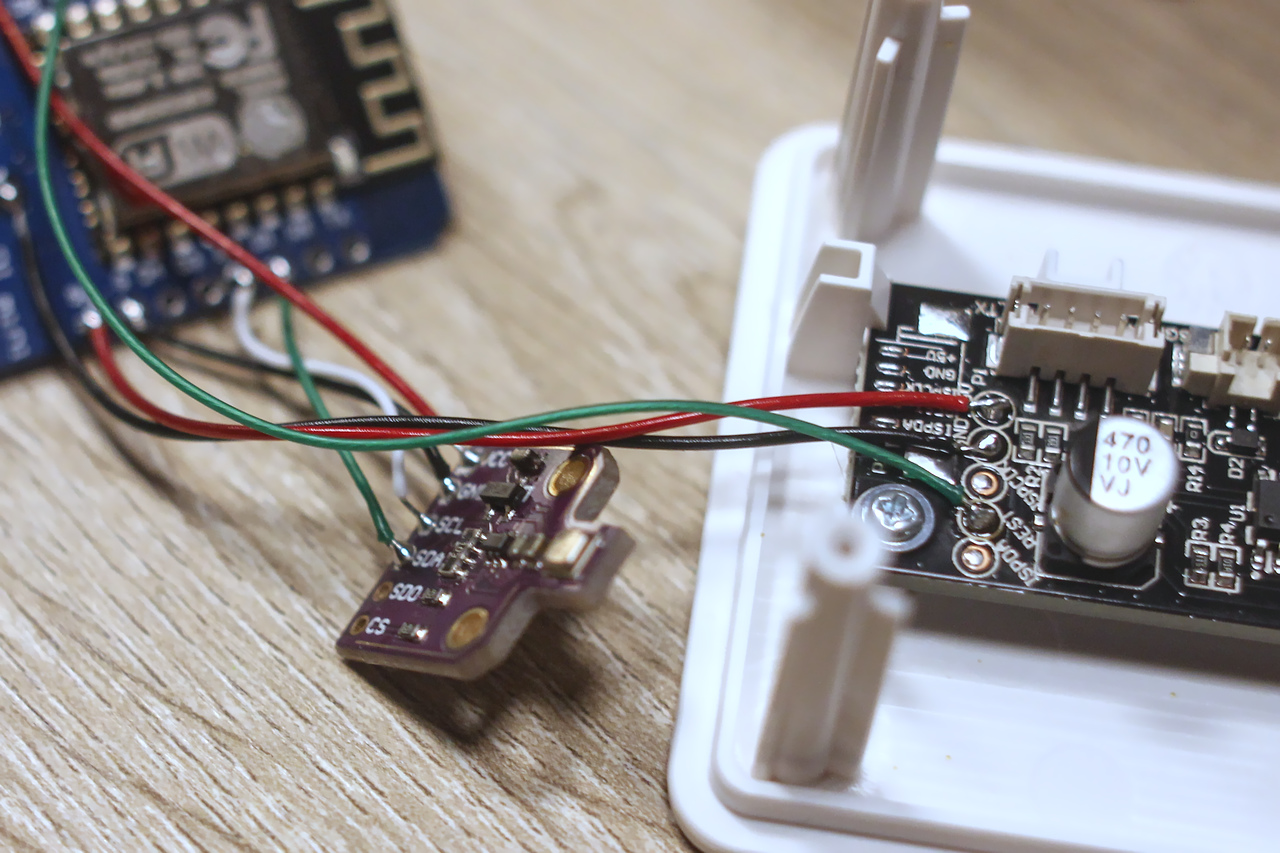
Consider using a bit of hot glue to secure the wires to the PCBs. It’s a simple step that can save you a lot of trouble by relieving stress on the solder joints. It should also be noted that the Vindriktning uses 5V while the ESP8266 typically needs 3.3V, though as the ESP8266 is 5V resistant you can wire them up directly, however a voltage divider or level shifter can be used to send the correct voltage to the ESP8266.
Configuring the device
Below, you’ll find my current configuration. If your wiring mirrors mine, feel free to use this as your template. But
hey, if you decided to march to the beat of your own drum and used different pins on the D1 Mini, make sure to adjust
the connections to the sensors accordingly. It’s also a smart move to personalize the name and friendly_name
settings. And while you’re at it, consider changing up the encryption key and OTA password for that extra layer of
security.
Now, let’s talk about a crucial setting for the BME680: the temperature_offset. See, relative humidity readings are
closely tied to air temperature. But here’s the catch – if your BME680 is snuggled up next to devices that emit heat,
its sensor might read temperatures a tad higher than the actual room temperature. This can throw your readings
off-kilter. My advice? Keep an eye on the temperature readings for a bit. Compare them to another reliable thermometer –
maybe your home’s thermostat or another sensor. If you notice the BME680 consistently overshooting the mark, nudge that
temperature_offset value up. On my desk, with all components exposed, an offset of 2 or 3 degrees did the trick.
But once I packed everything into the case, I had to crank it up to 6 degrees to sync up with another sensor in the
same room.
esphome:
  name: living-room-sensor
  friendly_name: Living Room Sensor

esp8266:
  board: d1_mini

# Enable logging
logger:

# Enable Home Assistant API
api:
  encryption:
    key: "r5e+0e+eigBjFpfNo+r/TIykX9lK40oG7+2NZ3RiG08="

ota:
  password: "eb24ad75972211d1fea73e45f5b90661"

wifi:
  ssid: !secret wifi_ssid
  password: !secret wifi_password

  # Enable fallback hotspot (captive portal) in case wifi connection fails
  ap:
    ssid: "Living-Room-Sensor"
    password: !secret wifi_password

captive_portal:


## Serial Port for the IKEA Sensor
uart:
  - rx_pin: D7
    # tx_pin: D8
    baud_rate: 9600

i2c:
  ## I²C Port - For Temp/Humidity/Pressure & CO²/VOC Sensors
  sda: D1
  scl: D2
  scan: true
  id: bus_a

bme680_bsec:
    # id
    # -----------
    # Identifier for this component, useful when working with multiple devices.
    # Must be unique, and can be used in the sensor sections to refer to the correct device.
    # Default: auto-computed
    id: bme680_internal

    # i2c address
    # -----------
    # Common values are:
    # - 0x76
    # - 0x77
    # Default: 0x76
    address: 0x77

    # Temperature offset
    # ------------------
    # Useful if device is in enclosure and reads too high
    # For example, if it reads 5C too high, set this to 5
    # This also corrects the relative humidity readings
    # Default: 0
    temperature_offset: 6

    # IAQ calculation mode
    # --------------------
    # Available options:
    # - static (for fixed position devices)
    # - mobile (for on a person or other moveable devices)
    # Default: static
    iaq_mode: static

    # Sample rate
    # -----------
    # Available options:
    # - lp (low power - samples every 3 seconds)
    # - ulp (ultra-low power - samples every 5 minutes)
    # Default: lp
    sample_rate: lp

    # Interval at which to save BSEC state
    # ------------------------------------
    # Default: 6h
    state_save_interval: 6h

sensor:
  ## IKEA PMS 2.5um Sensor
  - platform: pm1006
    id: aq_sensor
    pm_2_5:
      name: "IKEA 2.5µg"

  - platform: bme680_bsec
    # ID of the bme680_bsec component to use for the next sensors.
    # Useful when working with multiple devices
    bme680_bsec_id: bme680_internal

    temperature:
      # Temperature in °C
      name: "BME680 Temperature"
      sample_rate: lp
      filters:
        - median
    pressure:
      # Pressure in hPa
      name: "BME680 Pressure"
      sample_rate: lp
      filters:
        - median
    humidity:
      # Relative humidity %
      name: "BME680 Humidity"
      sample_rate: lp
      filters:
        - median
    gas_resistance:
      # Gas resistance in Ω
      name: "BME680 Gas Resistance"
      filters:
        - median
    iaq:
      # Indoor air quality value
      name: "BME680 IAQ"
      filters:
        - median
    iaq_accuracy:
      # IAQ accuracy as a numeric value of 0, 1, 2, 3
      name: "BME680 Numeric IAQ Accuracy"
    co2_equivalent:
      # CO2 equivalent estimate in ppm
      name: "BME680 CO2 Equivalent"
      filters:
        - median
    breath_voc_equivalent:
      # Volatile organic compounds equivalent estimate in ppm
      name: "BME680 Breath VOC Equivalent"
      filters:
        - median

text_sensor:
  - platform: bme680_bsec
    iaq_accuracy:
      # IAQ accuracy as a text value of Stabilizing, Uncertain, Calibrating, Calibrated
      name: "BME680 IAQ Accuracy"
Once everything is working, you can put everything back into the Vindriktning’s case, holding the new sensor and esp8266 in place with a bit of hot glue.
Setting up Home Assistant
With all the previous steps completed, ESPHome should now be successfully sharing sensor data with Home Assistant. The next step is setting up a dashboard card to display this data. Below is a screenshot of my setup as an example. It features temperature and humidity trends over the last two days, as well as particulate matter (PM2.5) and CO2 readings spanning the last two hours. I’ve included the yaml code for this card below, but remember to adjust the device names to fit your own configuration.
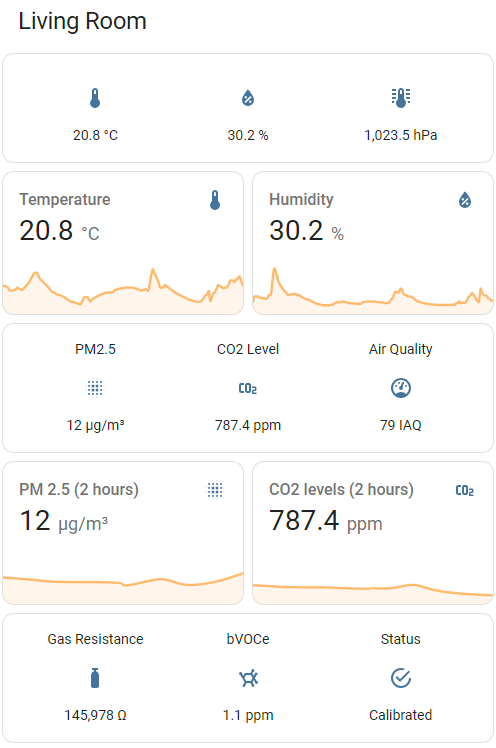
By clicking on a sensor’s graph, you can access a more detailed view that allows you to examine air quality trends over a variety of time ranges. If you’re interested in tracking changes over longer time periods, just a simple click on the graph and a popup will show an expanded plot.
type: vertical-stack
title: Living Room
cards:
  - type: glance
    entities:
      - entity: sensor.living_room_sensor_bme680_temperature
      - entity: sensor.living_room_sensor_bme680_humidity
      - entity: sensor.living_room_sensor_bme680_pressure
    show_name: false
  - type: horizontal-stack
    cards:
      - graph: line
        type: sensor
        entity: sensor.living_room_sensor_bme680_temperature
        hours_to_show: 48
        name: Temperature
        detail: 2
      - graph: line
        type: sensor
        entity: sensor.living_room_sensor_bme680_humidity
        hours_to_show: 48
        detail: 2
        name: Humidity
  - type: glance
    entities:
      - entity: sensor.living_room_sensor_ikea_2_5_g
        name: PM2.5
      - entity: sensor.living_room_sensor_bme680_co2_equivalent
        name: CO2 Level
      - entity: sensor.living_room_sensor_bme680_iaq
        name: Air Quality
    show_name: true
  - type: horizontal-stack
    cards:
      - graph: line
        type: sensor
        entity: sensor.living_room_sensor_ikea_2_5_g
        hours_to_show: 2
        name: PM 2.5 (2 hours)
        detail: 2
      - graph: line
        type: sensor
        entity: sensor.living_room_sensor_bme680_co2_equivalent
        hours_to_show: 2
        detail: 2
        name: CO2 levels (2 hours)
  - type: glance
    entities:
      - entity: sensor.living_room_sensor_bme680_gas_resistance
        name: Gas Resistance
      - entity: sensor.living_room_sensor_bme680_breath_voc_equivalent
        name: bVOCe
      - entity: sensor.living_room_sensor_bme680_iaq_accuracy
        name: Status
    show_name: true
How to interpret the PM2.5 and CO2 readings ?
It’s crucial to remember that this is a DIY solution, not precision-calibrated laboratory equipment. Therefore, while absolute values should be considered with a degree of skepticism, relative trends can provide valuable insights into changes in your home’s air quality and the effectiveness of your ventilation. Also, it’s worth noting that the BME680 sensor measures the total amount of volatile organic compounds (VOCs) in the air, not specifically CO2. It estimates CO2 levels based on the overall VOC readings and various assumptions.
For PM2.5, the generally recommended levels shouldn’t exceed 35 μg/m3 over a 24-hour period, with ideal values being below 12 μg/m3. Normal indoor CO2 levels range between 400 and 1000 ppm. It’s advisable to increase ventilation when these levels are surpassed.
When analyzing the plots, here’s what to look out for:
- Identifying Sharp Peaks: Cooking, for example, releases a variety of VOCs, which the sensor can detect. Keep an eye out for activities that might pollute your air and respond by enhancing ventilation or opening windows.
- Duration of Peak Levels: If the VOCs from cooking linger for extended periods, it indicates that your ventilation may be inadequate.
- Gradual Increases to Unsafe Levels: This often occurs during events like parties or in smaller rooms like bedrooms, where CO2 can build up over time, potentially impacting sleep quality.
- Unusually High Baseline Levels: Normally, if you record CO2 levels around 600-700 ppm in your living room, and they suddenly rise consistently, it might be time to inspect your ventilation system or replace the filters.
Conclusion
If you followed along this far you succeeded in creating a cost-effective DIY solution to monitor and enhance your home’s air quality. We combined the IKEA Vindriktning air quality monitor with a Wemos D1 Mini Pro microcontroller and a Bosch BME680 VOC sensor, resulting in a smart and efficient air monitoring system. This system not only provides real-time data but also integrates seamlessly with smart home systems like Home Assistant and ESPHome.
We covered everything from selecting and connecting the right hardware to configuring the device and interpreting the data it provides. By following this guide, you now have a tool that helps you make informed decisions about when to open windows, increase ventilation, or change filters, ensuring your home’s air quality is always at its best.
Remember, this is a DIY project and not a substitute for professional equipment, if you are concerned for the health of you and your family, or worry about being exposed to specific harmful gases like carbon-monoxide, … do get help from a professional.
Further reading
There are a lot of different variations to this project, check out some links below for more information!
- Transform Your IKEA Air Quality Sensor into a Smart Home Essential with This DIY Upgrade : 3ATIVE VFX Studio shows how to include a BME280 and a CSS811 sensor, as well as use read sensors from the Vindriktning (the light sensor and fan status)
- Hacking The IKEA VINDRIKTNING PM2.5 Sensor With Tasmota : Tutorial by VoltLog including a BME680, though here Tasmota is used instead of ESPHome
- This guide by Salvamipc that adds human presence detection (using the HLK-LD2410) and ambient light sensor (bh1750) to the Vindriktning
Or check out the next post, where we untether the sensor from Home Assistant and turn it into a stand-alone device.
Liked this post ? You can buy me a coffee