How to Upgrade Your Nintendo 3DS with USB-C Charging
A Step-by-Step Guide
Are you tired of fumbling with your Nintendo 3DS charging cable? Do you wish you could use a modern, reversible USB Type-C connector instead? With a few common tools and a little know-how, you can add a USB Type-C port to your Nintendo 3DS charging cradle in no time! In this blog post, we’ll show you how to modify your charging cradle to accept a USB Type-C connector, so you can charge your device with ease. We’ll cover everything from the materials you’ll need to the step-by-step process of drilling and soldering. This process is similar to adding a USB-C port to a Raspberry Pi Pico, which we covered in a previous post. The Nintendo 3DS charging cradle is a good candidate for this modification as there is plenty of room on the inside to add a USB-C breakout board and wire it up to the charging PCB.

What you need
Before we begin, let’s make sure you have all the tools and components required for this soldering project. Here’s what you should have at your workspace:
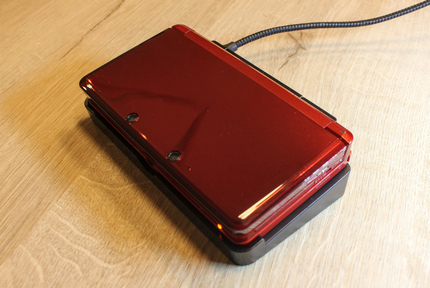
- A 3DS charging cradle
- Electrical wire – You’ll need two pieces (preferably black and red), which can be repurposed from e.g. an old USB cable.
- USB Type-C breakout board – This is the key component that should expose the ground (GND) and voltage (V) contacts, and it must have the necessary resistors for USB-C to USB-C charging capabilities (see options below).
- The right screwdriver – A triwing screwdriver is essential for opening up the 3DS charging cradle.
- Soldering gear – Have your soldering iron ready, along with a wet sponge for cleaning the tip and some quality solder.
- Hot glue gun with glue sticks – For securing everything in place after soldering.
- Precision tools – A drill with a 2mm drill bit and a set of small files, often labelled precision or jeweler’s files, for making the USB-C port opening.
- A multimeter – Critical for testing the connections and ensuring everything is working properly before you put it all back together.
Step-by-step instructions
Let’s begin the upgrade process by testing the USB-C breakout board. Use your multimeter to check that the board is functioning correctly when connected via a USB-C to USB-C cable to a charger or cell phone. The right output is 5 volts from the GND and V pads. If there’s no 5V reading, you might have a faulty board, or it might lack the necessary resistors for power delivery. Should this be the case, you can still proceed as I did in my Raspberry Pi Pico USB-C mod, though only with a USB-A to USB-C cable for charging.

With that settled, dismantle the charging cradle using a triwing screwdriver. Take care not to lose the internal springs when removing the bottom plate. The interior houses a PCB with ample space for the breakout board to sit comfortably.
Next, choose the breakout board’s precise location and gently drill a starting 2mm hole. Gradually file this out to accommodate the USB-C port, checking diligently for fit to avoid over-filing. This step requires a bit of patience and precision, as it ensures a clean look for your modification.
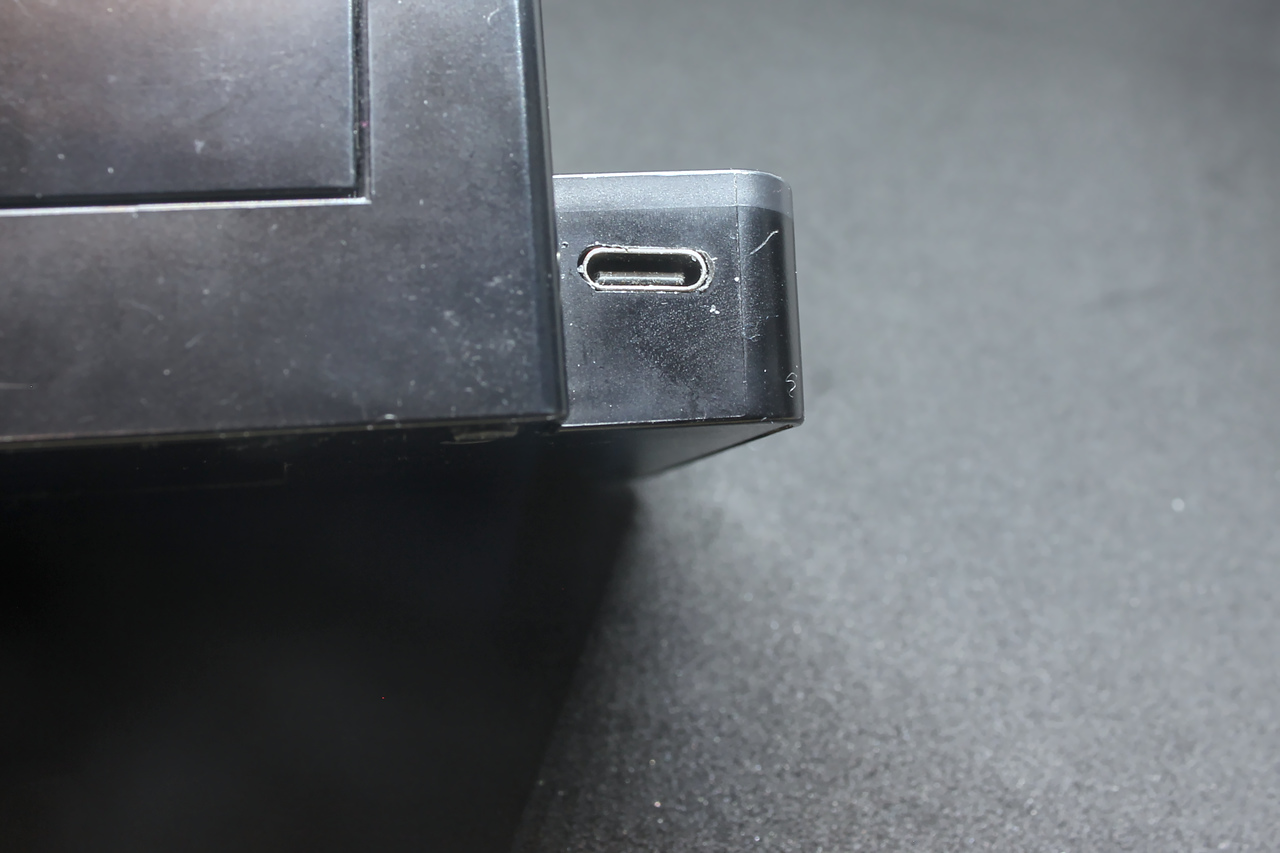
Now, connect the breakout board to the charging PCB. I found it effective to route wires under the PCB and make a small notch for them in the plastic below. Before proceeding, confirm the polarity is correct to prevent any issues. Test the connection with your multimeter to ensure a 5V reading on the charging pins.
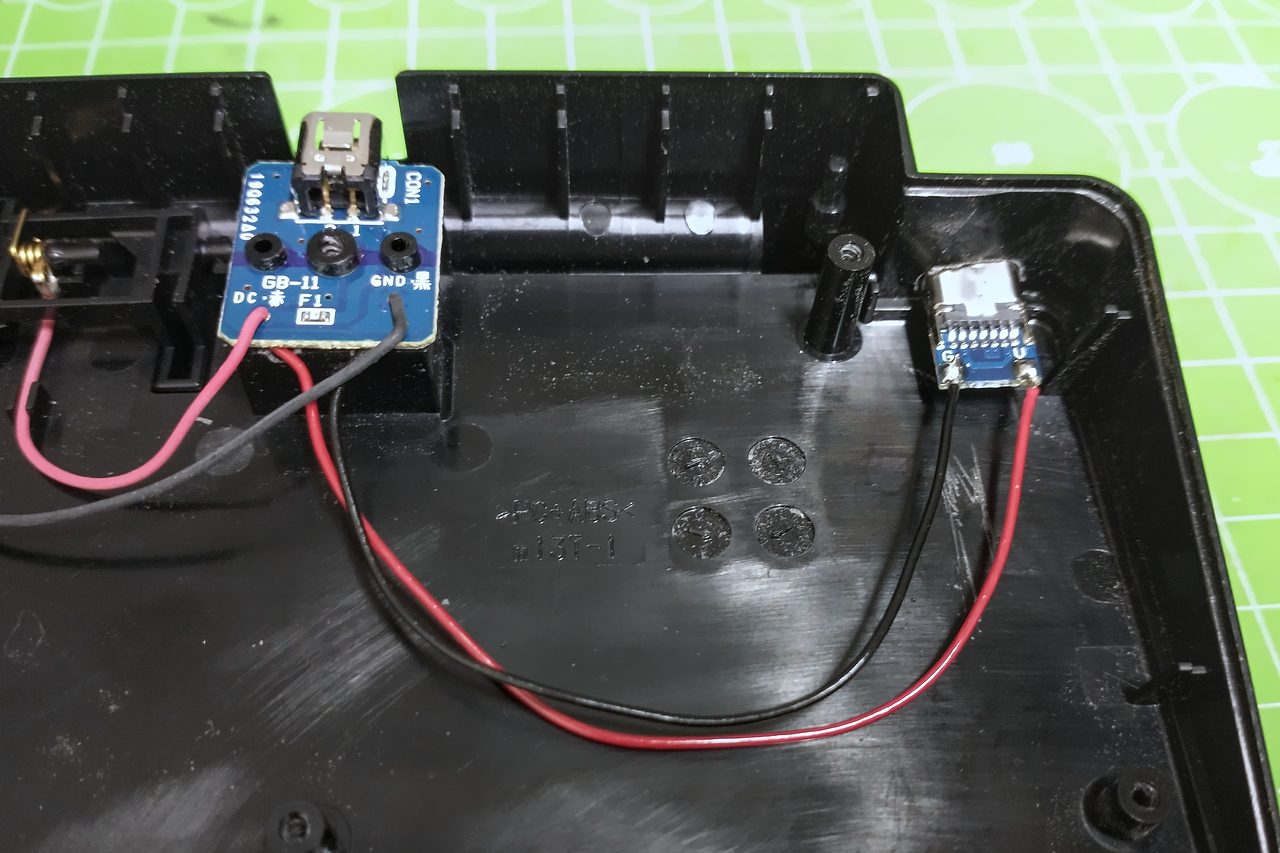
To finish, secure the breakout board with hot glue. Once the glue has set, give the setup another test with the multimeter. If everything looks good, reassemble the cradle. Your 3DS is now ready to charge via USB-C, free from the confines of its original proprietary charger.
Adding USB-C to additional devices
The versatility of USB-C doesn’t stop with the Nintendo 3DS cradle. I’ve successfully integrated USB-C ports into a variety of other gadgets, including my custom MacroPad/MIDIPad, and a DIY Bluetooth Speaker. Each of these devices offered ample internal space to work with, which certainly eases the modding process. For the MacroPad, specifically, I did employ kapton tape to insulate components and prevent any electrical shorts.
Now, not every device will be as straightforward. Some will present more of a challenge, demanding removal of the original connectors to make room for the USB-C port. I’m gearing up to tackle these complex conversions and will share the new adventures in detail soon.

Conclusion
With this straightforward modification, we’ve proven that enhancing your Nintendo 3DS charging cradle for a USB-C future is both achievable and safe, without the risk of harming your console. Just be vigilant with the polarity to avoid any mishaps.
While integrating a USB-C port directly into the 3DS would be the ultimate update, the simple cradle mod provides a significant improvement with minimal risk. The upgraded breakout boards now allow for seamless power delivery, making your charging sessions a breeze with the ubiquitous USB-C to USB-C cables.
It’s important to note that the original 3DS charger outputs a slightly lower voltage at 4.6V compared to the 5V provided through our mod. However, many users already charge their devices with standard USB-3DS cables that also deliver 5V, so this small change should not pose any concerns.
Disclaimer
Please note that while we strive to provide detailed and clear instructions, we are not responsible for any damage that may occur to your electronics during the modification process. Attempting such modifications requires careful handling and a certain level of proficiency with electronic components and soldering. If you choose to undertake this project, you do so at your own risk. Always ensure you are fully informed and equipped to carry out the task safely before proceeding.
Liked this post ? You can buy me a coffee