

Steganography using PIL and NumPy
hiding messages in plain sight
Steganography is the practice of hiding information in other images, audio, text, … You can add hidden messages to pictures, hide a file within another file, … Here we’ll try to hide some information inside an image.
Images are essentially two dimensional lists of pixels, which in turn consist of three integer numbers in the range 0-255 that represent values for red, green and blue. The difference between a pixel with value rgb(230, 129, 200) and rgb(229, 129, 201) are virtually imperceptible. So we can leverage this and hide information in that least significant bits of each pixel.
To hide a message in an image a function is needed that converts a string to a binary representation and one that embeds that data in the least significant bits of an image. To reveal the message we need to be able to reverse this, so first a function will extract the least significant bits and the final step is to convert them back into a string.
Converting Text to Binary and Back
To convert text to binary and back I found a function on StackOverflow though it is a little hard to understand. So let’s dissect the encode_text function step by step.
str.encodeis used to turn the string into bytesint.from_bytesnow creates an integer number from those bytes. This works because in Python integer numbers can be arbitrarily large.- this number is converted into binary (e.g. 0b00101011010101010101010001… ) using
bin() - an array slice is used to remove the first two characters (0b)
zfillis used to make sure the output is a multiple of 8
To revert from a binary the padding and slicing can be omitted and the other steps need to be reversed.
int()is used to convert a binary representation back to an integer number, note the parameter 2- using the
int.to_bytesthis number is converted back to a list of bytes str.decodeconverts bytes back to text
To check if this works a bit of Lorem ipsum is converted to binary and back.
# Convert the hidden message to bytes

def encode_text(text, encoding='utf-8', errors='surrogatepass'):
    bits = bin(int.from_bytes(text.encode(encoding, errors), 'big'))[2:]
    return bits.zfill(8 * ((len(bits) + 7) // 8))

def decode_text(bits, encoding='utf-8', errors='surrogatepass'):
    n = int(bits, 2)
    return n.to_bytes((n.bit_length() + 7) // 8, 'big').decode(encoding, errors) or '\0'


hidden_message = "Lorem ipsum dolor sit amet, consectetur adipiscing elit, sed do eiusmod tempor incididunt ut labore et dolore magna aliqua."

encoded_text = encode_text(hidden_message)
decoded_text = decode_text(encoded_text)

print("encoded:", encoded_text)
print("decoded:", decoded_text)
encoded: 010011000110111101110010011001010110110100100000011010010111000001110011011101010110110100100000011001000110111101101100011011110111001000100000011100110110100101110100001000000110000101101101011001010111010000101100001000000110001101101111011011100111001101100101011000110111010001100101011101000111010101110010001000000110000101100100011010010111000001101001011100110110001101101001011011100110011100100000011001010110110001101001011101000010110000100000011100110110010101100100001000000110010001101111001000000110010101101001011101010111001101101101011011110110010000100000011101000110010101101101011100000110111101110010001000000110100101101110011000110110100101100100011010010110010001110101011011100111010000100000011101010111010000100000011011000110000101100010011011110111001001100101001000000110010101110100001000000110010001101111011011000110111101110010011001010010000001101101011000010110011101101110011000010010000001100001011011000110100101110001011101010110000100101110
decoded: Lorem ipsum dolor sit amet, consectetur adipiscing elit, sed do eiusmod tempor incididunt ut labore et dolore magna aliqua.
Hiding Information in an Image
With functions to convert any text into binary and back, the code to bake that binary information into an image can be written. Here the PIL library is used to load the image, which is than turned into a one-dimensional list of all Red, Green and Blue values of the pixel in the image.
A suffix
The clause ix < len(encoded_text) else value ensures that if that pixels in spots where hidden information isn’t
stored remain identical.
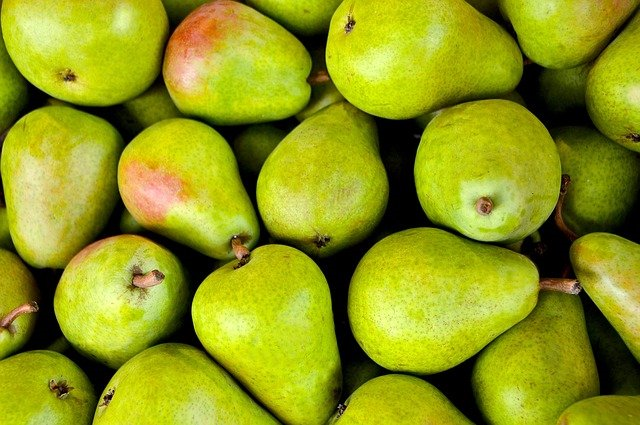
Finally, the one-dimensional array is turned back into a 2D image with 3 color channels and exported as PIL image. To
test this, and image pear.png is loaded, a Hello World message inserted and the image written to disk again. Make
sure that when saving the image, a lossless file format is used. JPEG files are compressed in a way that some minor
details are lost, this could remove the hidden content, so here PNG is used.
from PIL import Image
import numpy as np

def encode_in_image(filename, text_message):
    # Open the image, store the shape and convert to one-dimensional list
    input_im = Image.open(filename, 'r').convert("RGB")
    image_shape = np.asarray(input_im).shape
    flat_array = np.asarray(input_im).flatten()

    # Encode the message and add prefix
    encoded_text = encode_text(text_message + "<STOP>")

    # Enter message in the least significant bit where necessary
    encoded_array = [
        (0b11111110 & value) | int(encode_bit) if ix < len(encoded_text) else value
        for ix, (encode_bit, value) in enumerate(zip(encoded_text.ljust(len(flat_array), '0'), flat_array))]

    # Turn encoded array into image and return
    encoded_im = np.array(encoded_array).reshape(image_shape)
    return Image.fromarray(np.uint8(encoded_im)).convert('RGB')


encoded_im = encode_in_image('pears.png', "Hello World")
encoded_im.save('pears_with_hidden_message.png')
encoded_im
Extracting the Hidden Content
Cool, our image looks identical to the input image. By eye the minor differences are imperceivable. One last function
to add, to extract the hidden message from an image. This is fairly simple, after te image is loaded it is flattened
into a one-dimensional array again. For each value the least significant bit is extracted using a bit mask. These
values are joined into a single string, which is decoded using the decode_text function. Finally, we need to
break the decoded text on the suffix
Finally, we run that code on the image where a message was embedded … and voila, our original message comes out again.
def extract_from_image(filename):
    # Open image
    encoded_im = np.asarray(Image.open(filename, 'r').convert("RGB"))

    # Extract least significant bits from flat (one-dimensional) image
    extracted_bits = [str(0b00000001 & value) for value in encoded_im.flatten()]

    # Join bits together, decode and split at <STOP>
    extracted_bits = ''.join(extracted_bits)
    return decode_text(extracted_bits, errors='replace').split('<STOP>')[0]

extract_from_image('pears_with_hidden_message.png')
'Hello World'
Conclusion
Being able to hide information in a plain looking file is a cool gimmick. There are plenty of cool use-cases known, you can find more information on WikiPedia about this. As a binary signature is inserted, essentially all kinds of data could be hidden. For text, you need just under three pixels to store a single character using only the least significant bit. So a fair amount of text can be stored in an image. You could double that amount by either compressing the text first, and by the information into the two least significant bits of each pixels channels. Computerphile has an example where the entire works of Shakespeare are included in a single image of tree. Check out that movie here.
Liked this post ? You can buy me a coffee