

Python to Rust: Porting My Genetic Art Algorithm
One of the first posts on this blog showed how to implement a genetic algorithm in Python. Revisiting that project, I realized it is an ideal candidate to port to Rust: it is computationally heavy, and touches on performance, parallelism, and data structures. In short, a good excuse to finally spend time learning Rust.
At the same time, this project provided an opportunity to experiment with agentic AI coding tools, specifically Claude Code. I have been using AI-assisted development to improve documentation and test coverage, modernize aging codebases, and build small tools more quickly than I otherwise could. In all of those cases, however, I already understood the language and ecosystem well enough to guide the AI and critically review its output.
This raised a more interesting question: what does agentic coding look like when you are not fluent in the language at all? How effective is it when you are an absolute beginner in a new ecosystem, and can it still support meaningful learning rather than just fast results? This post documents that experiment: porting a Python-based genetic algorithm to Rust while using agentic AI as a primary implementation aid, and reflecting on what that approach enables, where it falls short, and what I learned along the way.
As always, the code for this project can be found on GitHub.
Setting up the environment
My go-to IDE is VSCode, and I’ve gotten into the habit of setting up a devcontainer for most of my projects. For experiments like this, I like not having to install the Rust toolchain on my main system. So I asked Claude Code to take my existing Python Dockerfile and turn it into one that had all the Rust tooling I would need. The result looked sensible, and it worked perfectly for this project, no extra headaches, no messing with local installations. It was a nice reminder of how much smoother experimentation can be when you isolate the environment from your day-to-day setup.
# Use Debian Trixie slim as base for Rust development
FROM debian:trixie-slim

# Install system dependencies needed for Rust development and VS Code devcontainer
# - curl: for downloading Rust installer and general use
# - git: version control
# - build-essential: C compiler and build tools (needed for some Rust crates)
# - pkg-config: helps Rust find system libraries
# - ca-certificates: SSL certificate validation
# - gnupg: GPG key management
# - libssl-dev: OpenSSL development files (commonly needed by Rust projects)
RUN apt-get update && apt-get install -y \
    curl \
    git \
    build-essential \
    pkg-config \
    ca-certificates \
    gnupg \
    libssl-dev \
    && rm -rf /var/lib/apt/lists/*

# Install Rust using rustup (official Rust installer)
# - Install to /usr/local/cargo and /usr/local/rustup for system-wide access
# - Use default stable toolchain
# - Add cargo bin to PATH
ENV RUSTUP_HOME=/usr/local/rustup \
    CARGO_HOME=/usr/local/cargo \
    PATH=/usr/local/cargo/bin:$PATH

RUN curl --proto '=https' --tlsv1.2 -sSf https://sh.rustup.rs | sh -s -- -y --default-toolchain stable --profile default \
    && chmod -R a+w $RUSTUP_HOME $CARGO_HOME

# Install Node.js LTS (needed for Claude Code)
RUN curl -fsSL https://deb.nodesource.com/setup_lts.x | bash - \
    && apt-get install -y nodejs \
    && rm -rf /var/lib/apt/lists/*

# Install Claude Code globally
# Using --no-fund and --no-audit flags to reduce installation noise
RUN npm install -g @anthropic-ai/claude-code --no-fund --no-audit

# Set the working directory
WORKDIR /workspace

# Verify installations
RUN rustc --version && \
    cargo --version && \
    claude --version

# Pre-create cargo registry directory with proper permissions
# This helps avoid permission issues when first running cargo commands
RUN mkdir -p $CARGO_HOME/registry && chmod -R a+w $CARGO_HOME

# Keep container running for devcontainer usage
CMD ["sleep", "infinity"]
Converting the Python Code
In the original blogpost, most of the code was included, so I fed it into Claude’s online interface and pointed it to my GitHub repository. I then asked Claude Opus 4.5 to draft a plan for porting the project to Rust. I saved this plan as a markdown file in my project.
From VSCode, I opened Claude Code in the terminal and asked it to review the plan and start implementing the first phase. I also made it clear that I wanted to learn from the process, asking it to explain implementation choices and include helpful comments in the code.
Step 1: The Triangle class
// Import the random number generator trait from the rand crate
use rand::Rng;
// Import serialization traits - these allow converting our Triangle to/from JSON
use serde::{Deserialize, Serialize};

/// Represents a single triangle gene with position, shape, and color
///
/// The `#[derive(...)]` macro automatically generates implementations for common traits:
/// - Clone: Allows creating copies with .clone()
/// - Debug: Allows printing with {:?} for debugging
/// - Serialize/Deserialize: Allows converting to/from JSON
#[derive(Clone, Debug, Serialize, Deserialize)]
pub struct Triangle {
    /// Three points defining the triangle vertices
    /// `pub` makes this accessible from outside the module
    /// `[(i32, i32); 3]` is a fixed-size array of 3 tuples, stored on the stack (fast!)
    pub points: [(i32, i32); 3],

    /// RGBA color values (0-255)
    /// `[u8; 4]` is an array of 4 unsigned 8-bit integers
    pub color: [u8; 4],

    /// Image dimensions for boundary checking
    /// These are private (no `pub`) - implementation details hidden from users
    img_width: u32,
    img_height: u32,
}

/// Types of mutations that can occur
///
/// Rust enums are more powerful than C enums - they can hold data (though these don't)
/// This is private to the module (no `pub`) since it's just an implementation detail
enum MutationType {
    Shift,  // Move entire triangle
    Point,  // Move single point
    Color,  // Change color
    Reset,  // Complete reset to random
}

// Implementation block - this is where we define methods for Triangle
// Like a class in other languages, but without inheritance
impl Triangle {
    /// Create a new random triangle within image boundaries
    ///
    /// `pub fn new(...)` is a public associated function (like a static method)
    /// Returns `Self` (which means Triangle in this context)
    pub fn new(img_width: u32, img_height: u32) -> Self {
        // Get a thread-local random number generator
        // `mut` means the variable can be modified (mutability must be explicit in Rust)
        let mut rng = rand::thread_rng();

        // Pick a random center point for the triangle
        // `as i32` converts u32 to i32 (signed integer, can be negative)
        let x = rng.gen_range(0..img_width as i32);
        let y = rng.gen_range(0..img_height as i32);

        // Generate three points around the center
        // `Self { ... }` constructs a new Triangle instance
        Self {
            // Array syntax: create 3 points with random offsets from center
            points: [
                (x + rng.gen_range(-50..=50), y + rng.gen_range(-50..=50)),
                (x + rng.gen_range(-50..=50), y + rng.gen_range(-50..=50)),
                (x + rng.gen_range(-50..=50), y + rng.gen_range(-50..=50)),
            ],
            // Random RGBA color (RGB + Alpha for transparency)
            color: [
                rng.gen_range(0..=255),  // Red
                rng.gen_range(0..=255),  // Green
                rng.gen_range(0..=255),  // Blue
                rng.gen_range(0..=255),  // Alpha (transparency)
            ],
            img_width,
            img_height,
        }
    }

    /// Apply a random mutation to this triangle
    ///
    /// # Arguments
    /// * `sigma` - Mutation strength (0.0-2.0, default 1.0)
    ///
    /// `&mut self` means:
    /// - `&` = borrowed (we don't take ownership)
    /// - `mut` = mutable borrow (we can modify the triangle)
    /// - `self` = this is a method that operates on an instance
    pub fn mutate(&mut self, sigma: f32) {
        // Import the weighted index distribution for selecting mutation types
        use rand::distributions::WeightedIndex;
        use rand::prelude::*;

        let mut rng = rand::thread_rng();

        // Weighted selection of mutation type
        // Higher weights = more likely to be selected
        // [30, 35, 30, 5] means Shift and Color are less common, Point is most common, Reset is rare
        let weights = [30, 35, 30, 5];
        let dist = WeightedIndex::new(&weights).unwrap();

        // Sample from the distribution to pick a mutation type
        // `match` is Rust's pattern matching - like switch but exhaustive (compiler checks all cases)
        let mutation_type = match dist.sample(&mut rng) {
            0 => MutationType::Shift,
            1 => MutationType::Point,
            2 => MutationType::Color,
            _ => MutationType::Reset,  // `_` is a catch-all pattern
        };

        // Apply the selected mutation
        // Note how each mutation method borrows the RNG mutably
        match mutation_type {
            MutationType::Shift => self.mutate_shift(sigma, &mut rng),
            MutationType::Point => self.mutate_point(sigma, &mut rng),
            MutationType::Color => self.mutate_color(sigma, &mut rng),
            // For reset, we create a new random triangle and replace self's data with `*self = ...`
            // The `*` dereferences the mutable reference to assign to the actual value
            MutationType::Reset => *self = Triangle::new(self.img_width, self.img_height),
        }
    }

    /// Shift entire triangle by a random amount
    ///
    /// Private method (no `pub`) - internal implementation detail
    /// `&mut self` - we need to modify the triangle's points
    /// `rng: &mut impl Rng` - accepts ANY type that implements the Rng trait
    ///   This is a "trait bound" - enables zero-cost polymorphism
    fn mutate_shift(&mut self, sigma: f32, rng: &mut impl Rng) {
        // Calculate random x and y shifts, scaled by sigma
        // `as f32` converts i32 to f32, then multiply by sigma, then `as i32` converts back
        let x_shift = (rng.gen_range(-50..=50) as f32 * sigma) as i32;
        let y_shift = (rng.gen_range(-50..=50) as f32 * sigma) as i32;

        // Iterate through all points and shift them
        // `&mut self.points` borrows the array mutably
        // `point` is a mutable reference to each element
        for point in &mut self.points {
            point.0 += x_shift;  // .0 accesses first tuple element (x)
            point.1 += y_shift;  // .1 accesses second tuple element (y)
        }
    }

    /// Move a single point of the triangle
    fn mutate_point(&mut self, sigma: f32, rng: &mut impl Rng) {
        // Pick a random point index (0, 1, or 2)
        let index = rng.gen_range(0..3);
        // Modify that point's coordinates
        self.points[index].0 += (rng.gen_range(-50..=50) as f32 * sigma) as i32;
        self.points[index].1 += (rng.gen_range(-50..=50) as f32 * sigma) as i32;
    }

    /// Change the color of the triangle
    fn mutate_color(&mut self, sigma: f32, rng: &mut impl Rng) {
        // Iterate through each color channel (R, G, B, A)
        for channel in &mut self.color {
            let change = (rng.gen_range(-50..=50) as f32 * sigma) as i32;
            // Important: clamp the value to 0-255 range to prevent overflow
            // `*channel` dereferences to get the u8 value
            // `.clamp(0, 255)` ensures value stays in valid range
            *channel = (*channel as i32 + change).clamp(0, 255) as u8;
        }
    }
}

// Conditional compilation: this module only exists in test builds
// Keeps test code out of release binaries
#[cfg(test)]
mod tests {
    // Import everything from parent module (Triangle and its types)
    use super::*;

    /// Test that triangle creation works correctly
    ///
    /// `#[test]` marks this function as a test - cargo test will run it
    #[test]
    fn test_triangle_creation() {
        let tri = Triangle::new(800, 600);
        // `assert_eq!` checks equality and panics with helpful message if they differ
        assert_eq!(tri.img_width, 800);
        assert_eq!(tri.img_height, 600);
        assert_eq!(tri.points.len(), 3);
        assert_eq!(tri.color.len(), 4);
    }

    /// Test that mutation actually changes the triangle
    #[test]
    fn test_triangle_mutation() {
        let mut tri = Triangle::new(800, 600);
        let original_color = tri.color;

        // Mutate multiple times - should eventually change something
        // `_` means we don't use the loop variable
        for _ in 0..10 {
            tri.mutate(1.0);
        }

        // Very unlikely to be identical after 10 mutations
        // `||` is logical OR - check if EITHER color OR points changed
        // `!=` works because we derived PartialEq (via Debug)
        assert!(tri.color != original_color || tri.points != [(0, 0); 3]);
    }
}
This is definitely far removed from Python code, we need to specify the type of numbers we’re using, explicitly define which variables are mutable, … but Claude Code did a very good job highlighting where some of the Rust paradigms are relevant. Also the way tests are implemented, inside the file they are testing, is very different from Python. Here the first downside of agentic coding hit me, this is not a good way to learn the syntax of a new language, at least not for me. For a new syntax to register, I have to do it the hard way by typing out a few thousand lines of code.
Furthermore, in the comments key Rust concepts like ownership and borrowing were mentioned. As I wasn’t familiar with these from other programming languages, I made a mental note this was something to look into later. Furthermore, by diving deeper into the code, I realized how central Rust’s enum and match keywords are, enabling expressive and type-safe handling of multiple cases, which made the implementation both clear and robust.
Though everything compiled, I didn’t have a working program, so I gave Claude Code the instructions to continue with the implementation.
Step 2: Paintings and Populations
As in the Python code, triangles (or circles as I’ve added an extra shape later) are combined into a list, the painting, this class also has the functionality to render itself, mutate its triangles. Multiple paintings are grouped into a population, with functions to evaluate the fitness of the individuals and find the most fit individual. Most generated code there was in line with the previous, but the latter evaluate stood out as it contained code that could be run in parallel. Admittedly, this a trivial problem to run in parallel, but it wouldn’t be straightforward in Python (requires multi-processing). Here you simply use .par_iter_mut() from the rayon crate (which packages/libraries are called in Rust) on a list and that’s it.
    /// Evaluate fitness for all individuals in parallel
    ///
    /// This is where Rust really shines!
    /// We're going to evaluate ALL individuals simultaneously across all CPU cores.
    ///
    /// **Rust Concept: Parallel Mutation**
    /// - `.par_iter_mut()` creates a parallel iterator over mutable references
    /// - Each thread gets exclusive access to different individuals
    ///
    /// **Why is this safe?**
    /// 1. Each individual is independent (no shared state)
    /// 2. `&mut` ensures exclusive access per thread
    /// 3. Compiler verifies this at compile time
    pub fn evaluate(&mut self) {
        // Process all individuals in parallel
        // `.par_iter_mut()` is the parallel version of `.iter_mut()`
        self.individuals.par_iter_mut().for_each(|individual| {
            // Render this individual's painting to an image
            let rendered = individual.chromosome.render();

            // Compare to target using the configured fitness function
            // Lower score = better match to target
            individual.fitness = Some(match self.fitness_config.function {
                FitnessFunction::Mad => {
                    image_diff_parallel(&rendered, &self.target_image)
                }
                FitnessFunction::EdgeWeighted => {
                    edge_weighted_fitness(&rendered, &self.target_image, &self.fitness_config)
                }
                FitnessFunction::MsSsim => {
                    ms_ssim_fitness(&rendered, &self.target_image, self.fitness_config.detail_weight)
                }
            });
        });
Step 3: Evolution and the Fitness Function
Once we have populations, we need a way to rank individuals, breed the best individuals and create the next generation, which hopefully is a bit better than the previous. Here better means, a painting consisting out of a number of triangles (or circles) that looks like a reference image. The closer pixels’ values are the better. For the evolution part, the Python implementation could rely on the evol library, Claude Code decided to implement it in Rust, and it worked. Pretty impressive as the evol package was not part of the code I provided (and as far as I can tell, it didn’t look that up online), so purely based on how the package was used it reconstructed the internals flawlessly. When using agentic coding I’ve noticed that relatively straightforward functionality is often generated as code, rather than pulling in an existing package. Which could create bloat and introduce a maintenance overhead, though on the flipside, it also adds in an easy access to those functions to customize them beyond what you could do using a package.
The fitness function here is where Claude Code made things interesting, it implemented this as a parallel function, computing different pixels in different threads. The function .par_iter() from the rayon library makes this again multi-threaded to leverage all available cores in your machine during this step.
/// Parallel version of image_diff (faster for large images)
///
/// **Rust Concept: Fearless Concurrency**
/// This function uses ALL your CPU cores automatically, safely!
///
/// How does Rust make parallel programming safe?
/// 1. The borrow checker prevents data races at compile time
/// 2. Only immutable references (&) are used, so parallel access is safe
/// 3. No locks, no mutexes needed - the type system guarantees safety
///
/// **When to use this?**
/// - Large images (>1000x1000 pixels) - overhead is worth it
/// - When you have multiple CPU cores (which you probably do!)
/// - The population evaluation (comparing many images) benefits hugely
pub fn image_diff_parallel(source: &RgbaImage, target: &RgbaImage) -> f64 {
    assert_eq!(
        source.dimensions(),
        target.dimensions(),
        "Images must have same dimensions"
    );

    // The ONLY difference: collect into vectors and use par_iter!
    //
    // **What's .par_iter()?**
    // - Creates a parallel iterator over a collection
    // - Rayon automatically splits work across CPU cores
    // - Uses work-stealing: idle cores help busy cores
    // - No manual thread management needed!
    //
    // We need to collect both iterators first since rayon's zip needs both sides parallel
    let source_pixels: Vec<_> = source.pixels().collect();
    let target_pixels: Vec<_> = target.pixels().collect();

    let total_diff: u64 = source_pixels
        .par_iter() // <-- Parallel iterator over source pixels
        .zip(target_pixels.par_iter()) // <-- Zip with parallel iterator over target pixels
        .map(|(s, t)| {
            let dr = (s[0] as i32 - t[0] as i32).abs() as u64;
            let dg = (s[1] as i32 - t[1] as i32).abs() as u64;
            let db = (s[2] as i32 - t[2] as i32).abs() as u64;
            dr + dg + db
        })
        .sum(); // Rayon's sum() automatically combines results from all threads

    total_diff as f64 / (source.width() * source.height() * 3) as f64
}
Step 4: The CLI
One thing I found Claude Code to be very useful for, is to create a CLI for applications. I personally find it tedious and I’m happy to hand this task over to AI. Here, Claude Code used the clap crate, which is an excellent choice! The CLI itself is simple but functional.
Step 5: Testing Things Out
As I instructed Claude Code to build the app in phases and run tests at each step, after a few rounds of building-failing-debugging-retrying the code compiled and the app was ready to be tested by me. Besides a small issue in rendering the image, it all worked!
I tested it out on the same image I used back in 2020, Van Gogh’s The Starry Night, and the first thing I noticed was that this quickly pushed my CPU to 95% usage and it stayed there!
# Run a quick test with triangles (100 generations)
./target/release/genetic-art \
  --input input/starry_night.jpg \
  --generations 100 \
  --shapes 100
I also noticed that it ran a lot faster, though I’m also using a new computer, so let’s find out how much of this is the implementation.
Performance Testing & Optimization
“Rewrite in Rust” might be a bit of a meme, but I immediately noticed a speedup when running my code. To get a better sense of what was going on, I did a few testruns and compared runtimes with the original Python implementation. Each test used a 570×452 pixel target image, and other parameters are listed in the tables below.
The results were a bit surprising. On a single thread, Rust was actually slower than Python, likely because the Pillow library in Python handles most of the image drawing and comparison more efficiently than the initial implementation. It also revealed something I didn’t realized, Python scaled terribly across multiple cores, becoming noticeably slower (!) when using more threads. Rust, on the other hand, handled multithreading beautifully. On my 8-core Ryzen 7 3700X, parallel efficiency was excellent, and once Rust was allowed to use multiple cores, it easily outpaced Python.
| Generations (n) | Shapes (n) | Threads (n) | Rust (mm:ss) | Threads (n) | Python (mm:ss) | Speedup (%) |
|---|---|---|---|---|---|---|
| 100 | 100 | 1 | 15:22 | 1 | 09:34 | 62% |
| 100 | 100 | 4 | 04:28 | 4 | 12:05 | 271% |
| 100 | 100 | 8 | 02:30 | 8 | 11:30 | 460% |
| Generations (n) | Shapes (n) | Threads (n) | Rust (mm:ss) | Threads (n) | Python (mm:ss) | Speedup (%) |
|---|---|---|---|---|---|---|
| 100 | 100 | 16 | 02:07 | 1 | 09:34 | 452% |
| 100 | 300 | 16 | 06:04 | 1 | 25:47 | 425% |
| 300 | 100 | 16 | 06:17 | 1 | 30:19 | 482% |
After asking Claude Code to check why the single threaded performance was actually worse than Python, it found a few places (related with drawing the images and comparing to the reference) where the code could be optimized. This all sounded plausible, so I decided to give it a go and green-light Claude Code to implement the most impactful change (optimizing the way the shapes were drawn, updating a small part of the image instead of the image as a whole). Now suddenly 100 generations with 100 shapes took 23 seconds instead of 2 minutes 7 seconds. Clearly Claude Code knows how to optimize things, so I started the reading about the next improvement it suggested: using SIMD, Single Instruction, Multiple Data, to optimize some of the calculations. After studying up on this, I did seem like a very reasonable thing to implement here, so I gave the okay to make the changes.
| Generations (n) | Shapes (n) | Threads (n) | Rust (mm:ss) | Threads (n) | Python (mm:ss) | Speedup (%) | Comment |
|---|---|---|---|---|---|---|---|
| 100 | 100 | 16 | 02:07 | 1 | 09:34 | 452% | First implementation |
| 100 | 100 | 16 | 00:23 | 1 | 09:34 | 2496% | Better painting |
| 100 | 100 | 16 | 00:11 | 1 | 09:34 | 5218% | Using SIMD |
| 100 | 100 | 1 | 01:45 | 1 | 09:34 | 547% | All optimizations (1 core) |
These additional optimizations turned out to be extremely worthwhile, on this little test the runtime went down from 127 seconds to 23 after improving the painting, with SIMD it went further down to a mere 11 seconds, that is a 10x improvement over the unoptimized Rust version and utilizing all cores we are now 52x faster than the Python version can possibly run.
Do note these benchmarks were single runs, so take the numbers as indicative rather than absolute, but the difference in performance between implementations is immediately obvious.
The Results
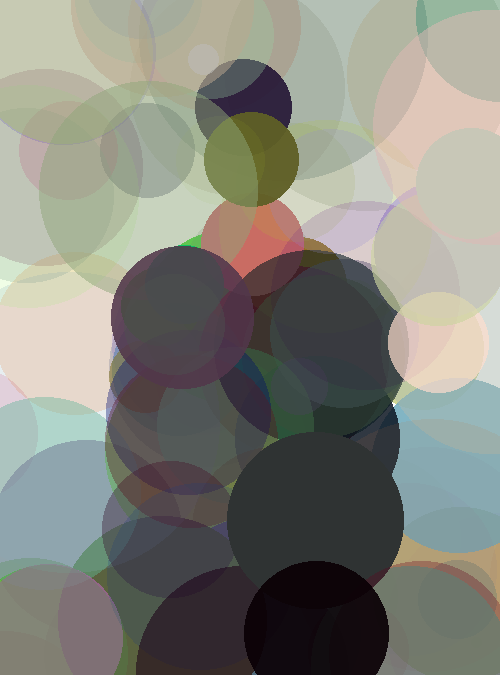
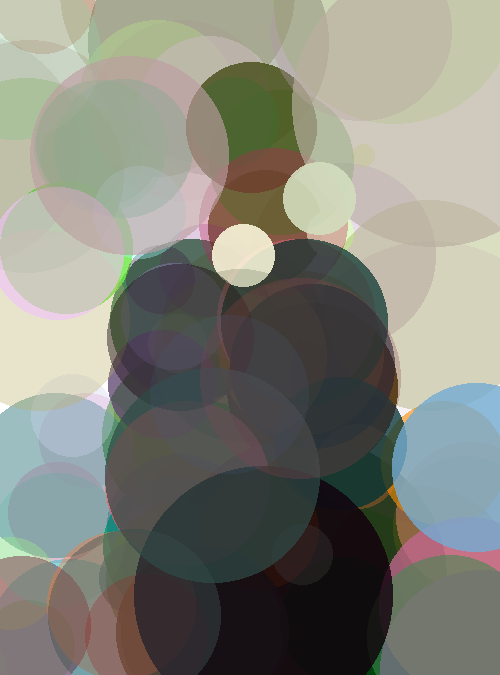
Running the Rust version with the same parameters as the original Python code produced very similar results. After enough iterations, both tend to converge on images that clearly resemble the target. As you might expect with a genetic algorithm, there’s a lot of randomness, so each run is different, but Rust (left) didn’t behave any differently than Python (right) in that regard. I’ve included a side-by-side comparison of outputs below, and visually they’re, aside from the usual stochastic variation, very similar.


One fun side effect of using agentic coding was how easy it was to experiment. I asked Claude Code to add a mode using circles instead of triangles, and it worked! The output using René Magritte’s The Son of Man as a target shows that the core algorithm is flexible enough to handle different primitives without rewriting the engine.

All in all, Rust gives you roughly the same results as Python, but faster and fully utilizing the CPU, while also letting you play around and tweak things much more freely.
Conclusion
As a technology, Claude Code is impressive: porting an existing tool to another language took less than an hour, with another hour or so spent doing the optimizations. The generated code was readable, compiled without friction, and came with sensible comments, tests, and coverage. At the same time, it is tempting to let the AI run ahead without staying in the loop. While it excelled at implementing familiar patterns and making reasonable architectural choices, such as reconstructing the internals of the evol library or introducing parallelism with rayon, it still required guidance on overall direction and verification that the output matched expectations. Early issues in image rendering were a good reminder that correct-looking code is not the same as correct behavior.
As a learning tool, the experience had clear strengths and limitations. Working on a project I already understood made it easy to identify which Rust concepts actually mattered for this type of application. Through reviewing the generated code, I gained a much better understanding of concepts like: ownership and borrowing, enums and pattern matching, rayon, and the surrounding tooling with cargo. The comments generated by Claude Code were particularly useful in pointing out these concepts and providing the right keywords to look up in the official documentation. However, with all code being written for me, syntax simply did not stick. I would not be able to write Rust from scratch after this project, and I cannot meaningfully judge how idiomatic the code is style-wise. Not having to write or modify any of the code was efficient, and I would not have had the time to take on this project, but also somewhat bittersweet, as actually enjoy that part of the process.
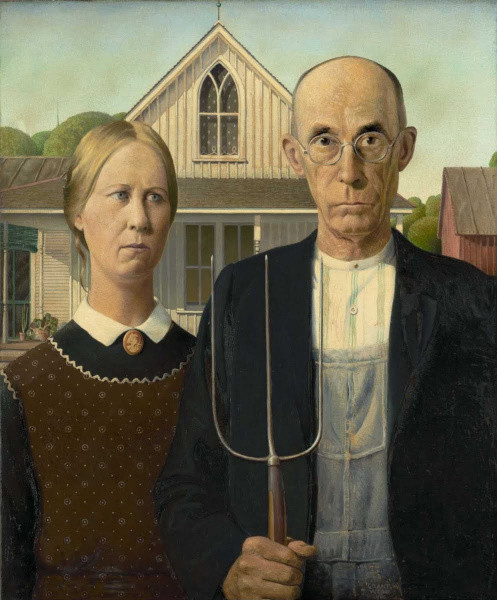
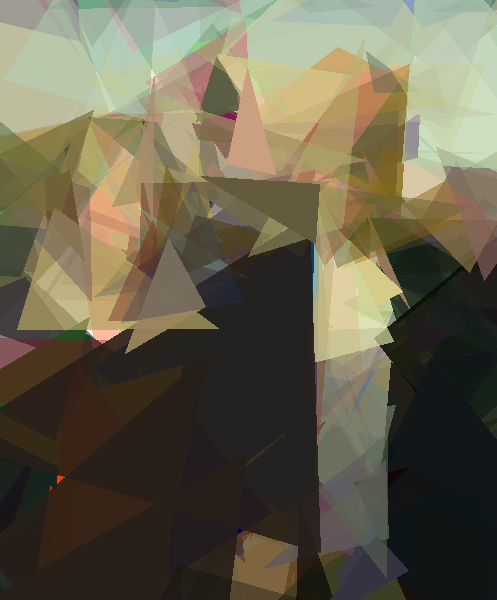

The real value was therefore not just the 50x speedup over Python, though that is certainly nice (and allows comparisons with more shapes, larger populations and more generations as you can see above in Grant Wood’s American Gothic, where 400 triangles or 600 circles were used). It was the ability to explore a new language with limited time available and get a quick impression of the tooling and the ecosystem. Using Claude Code on a project I would not have been able to do myself was also a humbling experience, these tools are incredebly powerfull! But they are not fully autonomous agents that can do a project like this from A-Z without guidance. The key is treating the AI as an experienced pair programmer: it can write the code, but you still need to understand the architecture, review the implementation, and verify that it solves the right problem. For exploring new technologies while still learning from a concrete, real project, this approach worked remarkably well.
Liked this post ? You can buy me a coffee