

Using a Smart Motion Sensor with Home Assistant
If you’re looking for a straightforward yet powerful method to safeguard your home or office, a smart motion sensor linked to Home Assistant might be the perfect solution for you. This way, you can establish a basic alarm system that can recognize and inform you of any unanticipated movements in your area. Regardless of whether you’re present or not, you can rest easy knowing that your property is being watched over around the clock. This article will demonstrate how to create this setup. Also for those wanting to use the sensor to switch on/off a light this post can be of value.

Getting started
Before you dive in, it’s important to check out our previous posts on “getting Home Assistant up and running with MQTT and ZigBee” as a starting point. Once you’ve got that set up, you can follow along with our working installation of Home Assistant with MQTT and ZigBee2MQTT already up and running. To get started, all you need are some ZigBee-compatible motion sensors. I opted for one from SilverCrest that I found on discount at the local grocery store, but other options should work just as well.
To begin, simply follow the instructions that come with your sensor to pair it with HA Once you’re connected,
give your sensor an appropriate name (I went with Motion Sensor Test). Then, head to
Settings > Devices & Services and click Configure in the Mosquitto broker panel. Here, you
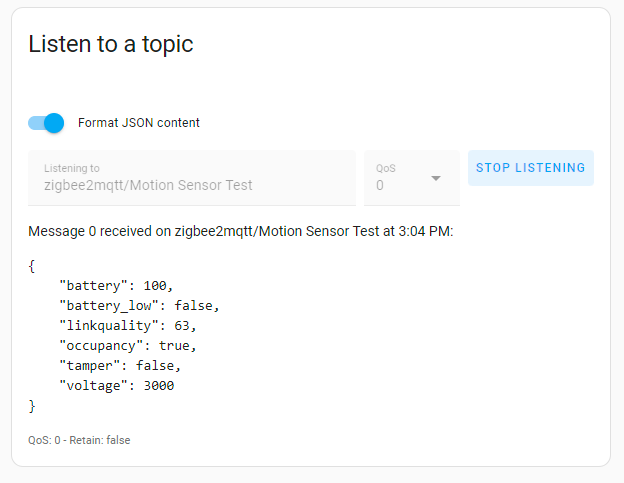
can listen in on MQTT messages to verify that your device is working properly. To start listening,
simply enter the name of your device (zigbee2mqtt/<your sensor name>) and click Start Listening. Now, try
triggering the sensor by moving in front of it. If a message pops up on the screen, you know your sensor is correctly
connected to Home Assistant, and you’re ready to start automating your home.
MQTT messages the sensors send
Here’s an example of a message that a motion sensor sends to MQTT. However, keep in mind that there are several different scenarios that can cause the sensor to broadcast a message:
- If the sensor has been tripped, it will send an MQTT message that includes
"occupancy": true. This will also deactivate the sensor for a certain amount of time (three minutes for the model I’m using). - When the sensor reactivates after being tripped, it will send another MQTT message that includes
"occupancy": false. - If someone tampers with the sensor by removing it from its socket, it will broadcast a message that includes
"tamper": trueas soon as the tamper button on the back of the sensor is released. (See the tamper button at the back of the sensor below, this will trigger once it is no longer pressed) - As long as the tamper button remains unpressed, the sensor will repeat the message that includes
"tamper": trueevery half hour.

To trigger automations when motion is detected, we need a filter that only responds to messages that include “occupancy”: true. By doing this, we can be sure that our automations are only triggered when the motion sensor is actually detecting motion, rather than being activated by a tamper message or a reactivation message.
{
    "battery": 100,
    "battery_low": false,
    "linkquality": 63,
    "occupancy": true,
    "tamper": false,
    "voltage": 3000
}
Creating automations
Now that we have an understanding of the information that the sensor(s) will be transmitting and when, we can create
an automation. However, before setting this up as an alarm, I suggest doing some additional testing by simply counting
how many times the sensor is triggered each day. To do this, we will set up a counter in Home Assistant’s configuration.yaml
by adding the following code:
counter:
  motion_triggers:
    initial: 0
    step: 1
Once the file is saved and HA has been restarted, the counter will be enabled. Next, we’ll add two automations:
one that triggers each time an MQTT message from the sensor appears with "occupancy": true and increases our counter,
and a timer that resets the count every day at midnight. In recent versions of HA, this can easily be done from the
interface. Go to Settings > Automations & Scenes and click Create Automation.
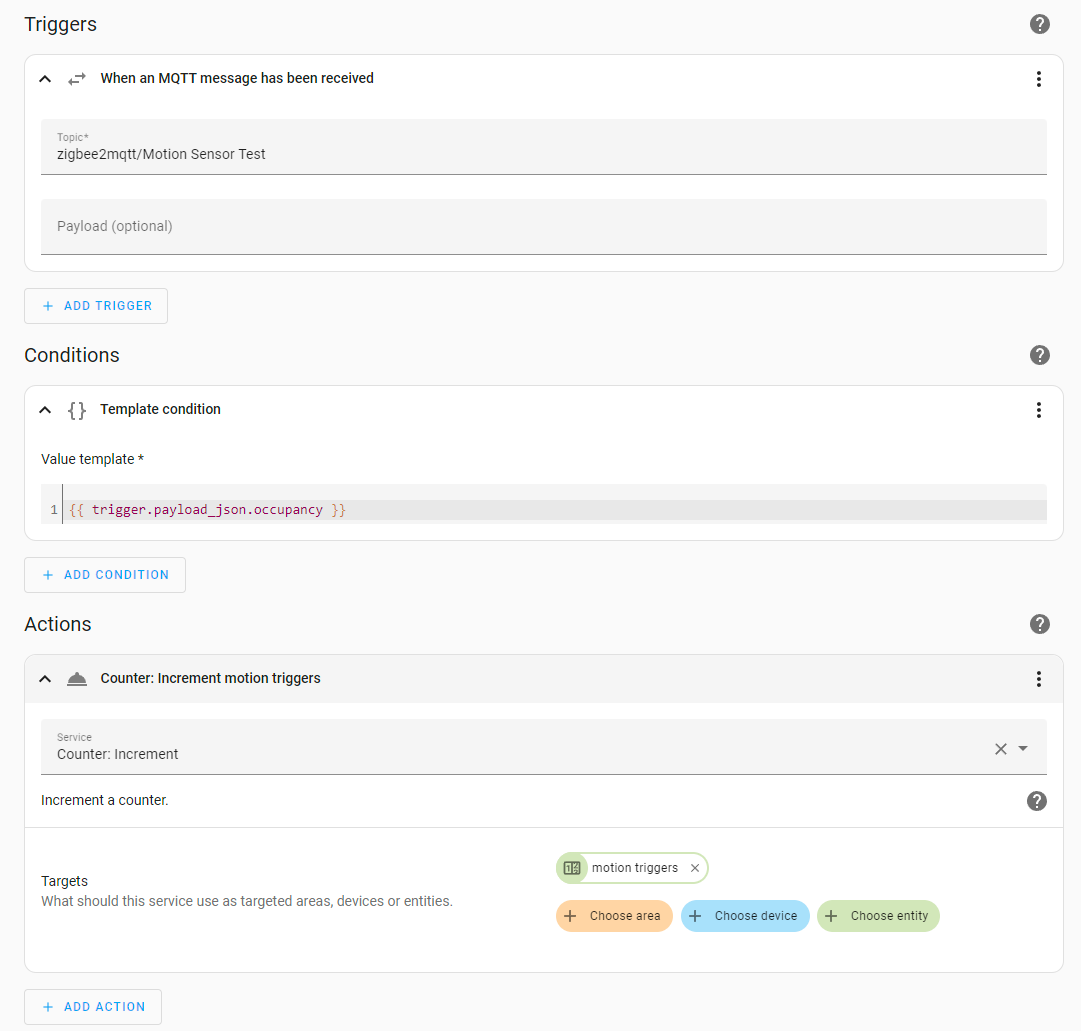
The trigger should be set to When an MQTT message has been received, and the topic should be set to
zigbee2mqtt/<your sensor name>. To avoid triggering on each message, we need a Template condition under
conditions, with {{ trigger.payload_json.occupancy }} as the Value template. This will filter the messages
from the sensor and only execute the actions on relevant messages. Finally, we add an action with a Service
Counter:Increment, which points to the counter we created in the previous step.
To reset the counter, a second automation needs to be set up, as shown below:
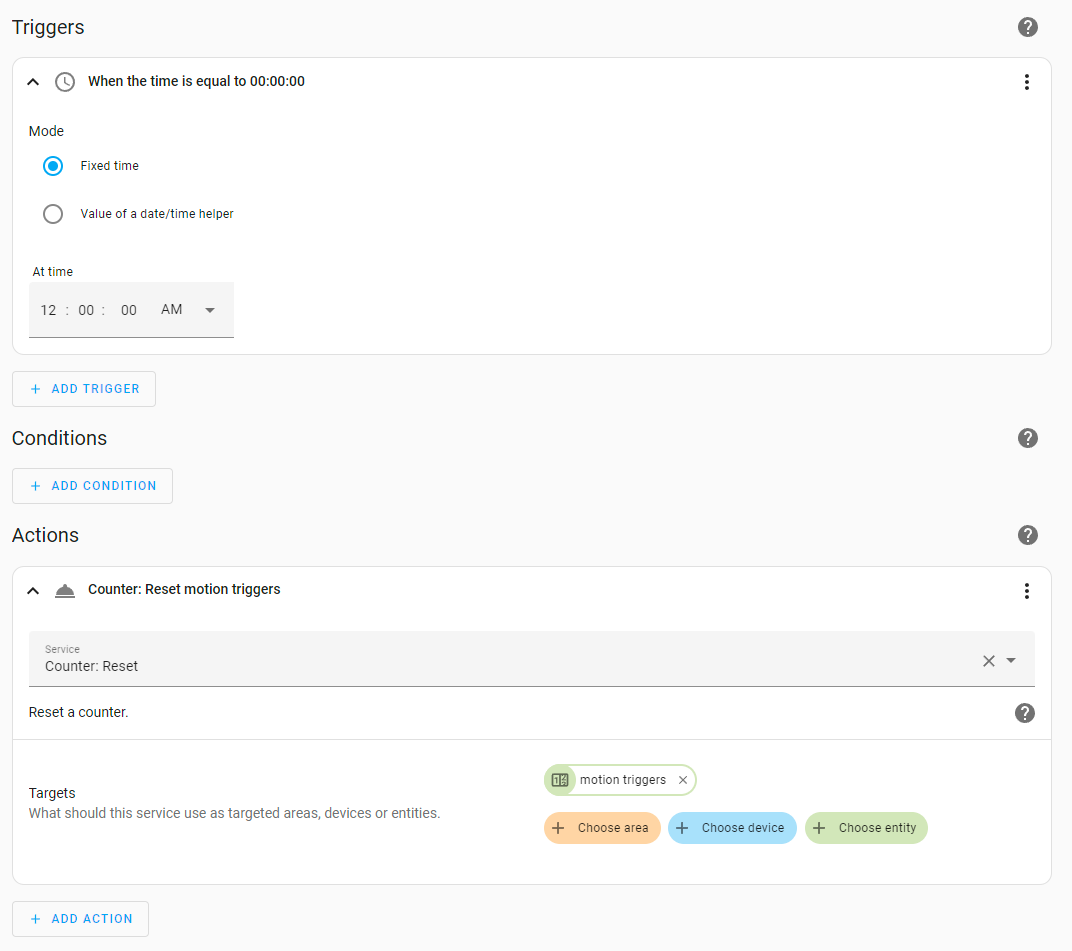
Let this run for a few days to check how well it works and if there are any false positives. A false positive could cause unnecessary worry or actions if you are away from home. However, after testing, there were no unexpected triggers during times when no one was at home or when we were sleeping.
Setting up HA as an alarm system
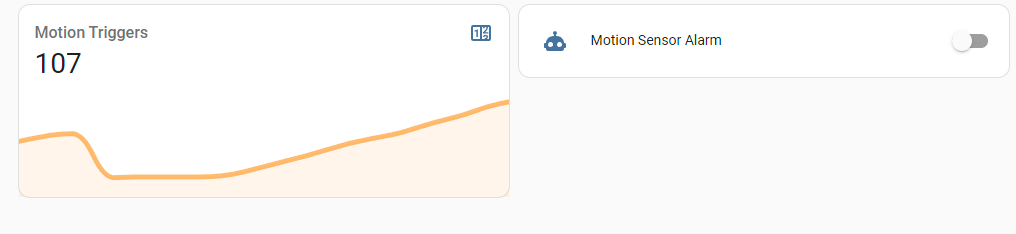
Now that we know how to increase a counter, we can also send a notification to a mobile device that has the Home Assistant app. The trigger and condition for this automation are the same as before, but we’ll change the action to send a notification to my phone. If you have an audio output device that can start playing a noise, you could trigger that along with the notification.

However, I don’t want to receive notifications every time I pass by the sensor myself. To avoid this, I added a few items to the dashboard, so I can easily turn notifications on and off and keep an eye on the counter.
Conclusion
In conclusion, motion sensors are an affordable and effective way to emulate a security system with Home Assistant. We can easily integrate these sensors into our system and use them to trigger various automations such as sending notifications to our mobile devices, activating alarms, and tracking occupancy. This can provide some peace of mind knowing that no unexpected visitors showed up during your holidays without breaking the bank.
In addition to the benefits mentioned above, motion sensors have other practical uses in home automation. For example, they can be used to turn on lights when someone enters a room and turn them off after a certain amount of time without motion, which can save energy and money. They can also be used to adjust the thermostat based on whether a room is occupied or not, which can lead to further energy savings.
Overall, motion sensors are a versatile and affordable tool that can enhance the functionality of your home automation system, while also providing added security and peace of mind. Whether you are a DIY enthusiast or a seasoned home automation user, integrating motion sensors into your system is definitely worth considering.
Disclaimer
Although a smart motion sensor connected to Home Assistant can provide an easy and effective way to enhance your home or office security, it’s important to note that these systems may have their limitations. While they can alert you to unexpected movements, they may not be up to the same standards as professionally installed, dedicated alarm systems. As such, it’s always wise to assess your security needs and consider consulting with a security expert to determine the best solution for your specific circumstances.
Liked this post ? You can buy me a coffee