

Kan ChatGPT voor mij een Python-GUI-app schrijven?
Stel je voor dat je een volledig werkende Python-GUI-applicatie kunt maken door enkel instructies te geven. Je hoeft geen uren meer te besteden aan code schrijven en debuggen: je laat AI gewoon het zware werk doen. In deze post verkennen we wat ChatGPT kan bij het ontwikkelen van een Python-GUI-app en ontdekken we hoe eenvoudig het kan zijn om je ideeën tot leven te brengen.
In deze post maken we een eenvoudige maar krachtige Python-GUI-applicatie waarmee gebruikers snel en efficiënt bijschriften voor afbeeldingen kunnen schrijven. De app toont een afbeelding en biedt een gebruikersinterface waarin de gebruiker een bijschrift voor die afbeelding kan invoeren. Dat wordt vervolgens in een bijbehorend tekstbestand opgeslagen. Zo kun je het proces om bijschriften voor afbeeldingen te maken aanzienlijk versnellen, een essentiële stap bij het trainen van andere AI-systemen zoals Stable Diffusion.
Wanneer je met een AI zoals ChatGPT aan grotere projecten werkt, is een stapsgewijze aanpak essentieel. Zo kan de AI bij elke iteratie relatief kleine onderdelen van het project verbeteren, in plaats van het hele project in één keer te proberen aanpakken. Door het project op te delen in kleinere, behapbare taken, zorg je ervoor dat de AI aan de belangrijkste en relevantste onderdelen werkt. Bovendien kun je eventuele fouten of problemen gemakkelijker herkennen en oplossen. Deze aanpak maakt ook een efficiënter gebruik van middelen mogelijk, omdat de AI zich op specifieke taken kan richten in plaats van alles tegelijk te proberen afhandelen.
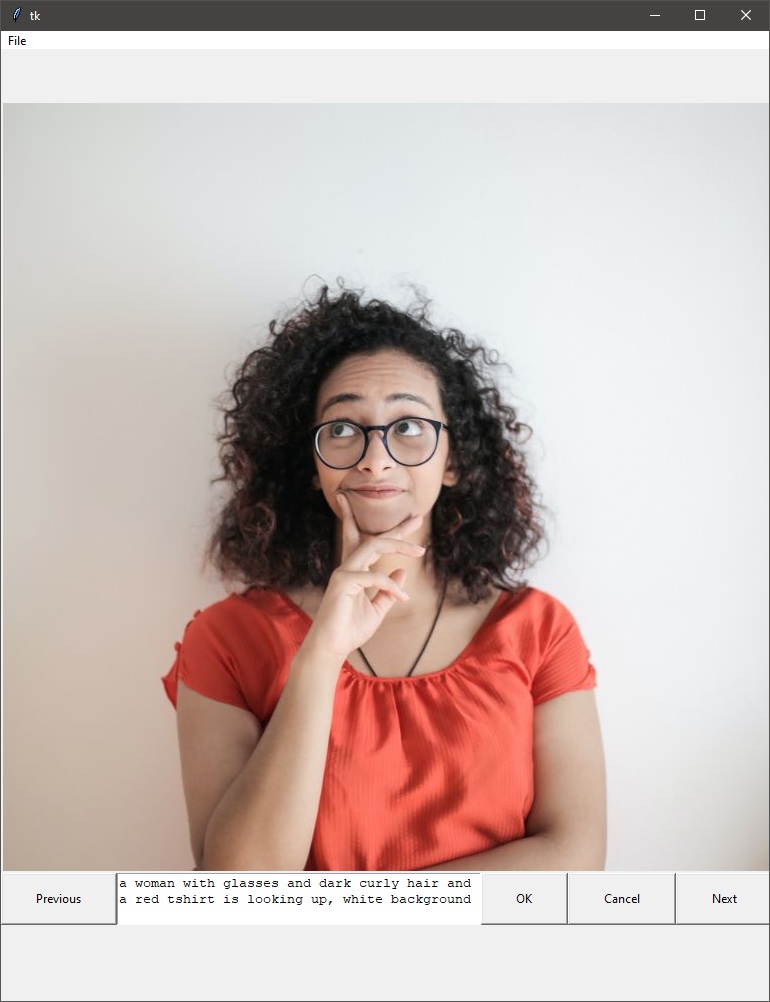
In deze post gebruiken we die stapsgewijze aanpak om onze Python-GUI-applicatie te bouwen. We beginnen met de verschillende beschikbare GUI-bibliotheken te bekijken. Vervolgens bouwen we de app in fasen, waarbij we ons telkens op één taak richten. Deze aanpak maakt het ontwikkelproces niet alleen beter beheersbaar, maar stelt ons ook in staat om elk onderdeel van de app te testen en te verbeteren voordat we naar het volgende gaan. Zo kunnen we een robuustere en beter afgewerkte applicatie maken die aan onze behoeften voldoet.
Het volledige gesprek is beschikbaar, want hier worden alleen de belangrijkste punten uitgelicht. De uiteindelijke code van dit experiment vind je op de GitHub-pagina van ClipApp.
Aan de slag
Voordat we onze Python-GUI-applicatie beginnen te bouwen, is het belangrijk om eerst de verschillende mogelijkheden voor een GUI in Python te begrijpen. Er bestaan verschillende populaire bibliotheken om een GUI in Python te bouwen, zoals Tkinter, PyQt, wxPython en Kivy, om er maar enkele te noemen. Elk van die bibliotheken heeft haar eigen functies en mogelijkheden, en het is belangrijk om de juiste te kiezen voor jouw specifieke behoeften. Door ChatGPT bovendien te vragen welke bibliotheken er bestaan, krijgen we een idee van welke bibliotheken de AI tijdens de training vaak heeft gezien en waarover het dus kennis zal hebben.
Opmerking: De fragmenten uit mijn oorspronkelijke gesprekken met ChatGPT zijn hieronder bewust in het Engels behouden.
We beginnen dus algemeen en vragen: “I’m making a GUI application in python, can you pick a good library for a small program and show me code to start off with?”
ChatGPT: There are several libraries you can use to create a GUI application in Python, but some of the most popular ones are Tkinter, PyQt, and wxPython.
Tkinter is a built-in library in Python for creating simple GUI applications. It is a good choice for small programs and beginners. Here is an example of creating a simple window using Tkinter:
import tkinter as tk

root = tk.Tk()
root.mainloop()
PyQt is another popular library that is widely used for creating more advanced GUI applications. It is a set of Python bindings for the Qt library. Here is an example of creating a simple window using PyQt:
import sys
from PyQt5.QtWidgets import QApplication, QWidget

app = QApplication(sys.argv)
window = QWidget()
window.show()
sys.exit(app.exec_())
wxPython is another popular library for creating GUI applications in Python. It is a set of Python bindings for the wxWidgets library. Here is an example of creating a simple window using wxPython:
import wx

app = wx.App()
frame = wx.Frame(None, title='Hello World')
frame.Show()
app.MainLoop()
It’s worth noting that PyQt and wxPython are larger libraries and more complex than Tkinter. You can choose the one that best fits your needs based on your skills and the requirements of your project.
Hieruit blijkt dat ChatGPT iets weet over Tkinter, PyQt en wxPython. Omdat Tkinter een ingebouwde bibliotheek is, gaan we daarmee verder. Ik hoop uiteindelijk een zelfstandige app te bouwen, en door extra bibliotheken te vermijden wordt die laatste stap wat eenvoudiger.
Laat ChatGPT eerst code voor de lay-out schrijven
De eerste stap is code verkrijgen die de nodige elementen op het scherm plaatst. Hun werking kunnen we later toevoegen. We beschrijven dus eerst de gewenste lay-out en kijken of ChatGPT iets kan genereren met de Tkinter-bibliotheek.
You: Let’s continue with Tkinter, I need in the middle of the screen a widget that can display an image with an editable text box underneath. Right of the text box an ‘Ok’ and ‘Cancel’ button. Left and right of the image buttons to navigate.
ChatGPT: You can accomplish this layout using a combination of Tkinter’s built-in widgets such as the Label, Entry, Button, and Frame widgets.
Here is an example of how you can create this layout:
import tkinter as tk
from tkinter import PhotoImage

root = tk.Tk()
root.geometry("500x500")

# Creating Frame
middle_frame = tk.Frame(root)
middle_frame.pack(pady=50)

#Creating Image
image = PhotoImage(file = "path_to_image")
image_label = tk.Label(middle_frame, image=image)
image_label.grid(row=0, column=0, padx=50)

#Creating Text Box
text_box = tk.Entry(middle_frame)
text_box.grid(row=1, column=0, padx=50)

#Creating Ok button
ok_button = tk.Button(middle_frame, text="OK", command=lambda:print("OK button pressed"))
ok_button.grid(row=1, column=1)

#Creating Cancel button
cancel_button = tk.Button(middle_frame, text="Cancel", command=lambda:print("Cancel button pressed"))
cancel_button.grid(row=1, column=2)

#Creating navigate button
previous_button = tk.Button(middle_frame, text="Previous", command=lambda:print("previous button pressed"))
previous_button.grid(row=0, column=1)

next_button = tk.Button(middle_frame, text="Next", command=lambda:print("next button pressed"))
next_button.grid(row=0, column=2)

root.mainloop()
In this example, the middle_frame is created and added to the root window. The image_label is created to display the image, and it’s added to the middle_frame. The text_box is created to allow the user to enter text, and it’s added to the middle_frame. The ok_button and cancel_button are created and added to the middle_frame.
The previous_button and next_button are created and added to the middle_frame.
The grid method is used to position the widgets within the frame.
The padx and pady options are used to add some padding around the widgets.
The file = "path_to_image" should be replaced with the path of the image you want to display.
The lambda:print("OK button pressed") and lambda:print("Cancel button pressed") is a simple callback function to check if the button is pressed.
You can customize the layout and functionality to suit your needs.
Hoewel de eerste code als vertrekpunt kan dienen, moeten we enkele elementen aanpassen aan de behoeften van onze applicatie. Zo kan de afbeelding te klein zijn om de beelden waarvoor de app bedoeld is goed weer te geven. Bovendien bevat de code nog geen menubalk, terwijl die handig zou zijn voor navigatie en structuur. Om die problemen aan te pakken, passen we de code snel aan en bezorgen we de bijgewerkte versie aan ChatGPT. We vragen ChatGPT specifiek om een menubalk toe te voegen met een item “File” en twee opties: “Open” en “Exit”.
You: I updated the code, can you add a menu bar with a button file and a dropdown with an Open button and Exit button. The exit button needs to close the app
if __name__ == '__main__':
    import tkinter as tk
    from tkinter import PhotoImage

    root = tk.Tk()
    root.geometry("1000x900")

    # Creating Frame
    middle_frame = tk.Frame(root)
    middle_frame.pack(pady=50)

    # Creating Image
    image = PhotoImage(file="./img/empty_file.png")
    image_label = tk.Label(middle_frame, image=image)
    image_label.grid(row=0, column=1, padx=50)

    # Creating Text Box
    text_box = tk.Entry(middle_frame)
    text_box.grid(row=1, column=0, padx=50)

    # Creating Ok button
    ok_button = tk.Button(middle_frame, text="OK", command=lambda: print("OK button pressed"))
    ok_button.grid(row=1, column=1)

    # Creating Cancel button
    cancel_button = tk.Button(middle_frame, text="Cancel", command=lambda: print("Cancel button pressed"))
    cancel_button.grid(row=1, column=2)

    # Creating navigate button
    previous_button = tk.Button(middle_frame, text="Previous", command=lambda: print("previous button pressed"))
    previous_button.grid(row=0, column=0)

    next_button = tk.Button(middle_frame, text="Next", command=lambda: print("next button pressed"))
    next_button.grid(row=0, column=2)

    root.mainloop()
ChatGPT: You can add a menu bar in Tkinter by creating an instance of the Menu widget and adding it to the
root window. You can then create instances of the Menu widget for each menu option and add them to the main menu.
To create a dropdown menu, you can create instances of the Menu widget and add them to the main menu using the
add_cascade method. Here is an example of how you can add a menu bar with a “File” menu that has an “Open”
button and an “Exit” button:
import tkinter as tk
from tkinter import PhotoImage

root = tk.Tk()
root.geometry("1000x900")

# Creating Frame
middle_frame = tk.Frame(root)
middle_frame.pack(pady=50)

# Creating Image
image = PhotoImage(file="./img/empty_file.png")
image_label = tk.Label(middle_frame, image=image)
image_label.grid(row=0, column=1, padx=50)

# Creating Text Box
text_box = tk.Entry(middle_frame)
text_box.grid(row=1, column=0, padx=50)

# Creating Ok button
ok_button = tk.Button(middle_frame, text="OK", command=lambda: print("OK button pressed"))
ok_button.grid(row=1, column=1)

# Creating Cancel button
cancel_button = tk.Button(middle_frame, text="Cancel", command=lambda: print("Cancel button pressed"))
cancel_button.grid(row=1, column=2)

# Creating navigate button
previous_button = tk.Button(middle_frame, text="Previous", command=lambda: print("previous button pressed"))
previous_button.grid(row=0, column=0)

next_button = tk.Button(middle_frame, text="Next", command=lambda: print("next button pressed"))
next_button.grid(row=0, column=2)

# Creating main menu
menubar = tk.Menu(root)
root.config(menu=menubar)

# Creating File menu
file_menu = tk.Menu(menubar, tearoff=0)
menubar.add_cascade(label="File", menu=file_menu)
file_menu.add_command(label="Open", command=lambda: print("Open button pressed"))
file_menu.add_command(label="Exit", command=root.destroy)

root.mainloop()
In this example, the menubar is created and added to the root window. The file_menu is created and added to the main menu using the add_cascade method. The Open button and Exit button are created and added to the file_menu using the add_command method. The command option is used to specify the function that should be called when the button is pressed. In this case, when the Exit button is pressed the root.destroy() function is called which will close the app.
You can customize the menu and the functionality to suit your needs.
Met wat heen-en-weer kun je het gedrag van elk element vastleggen. Eén enkele prompt gebruiken om code voor één element te verkrijgen werkt het best. Herhaal dat tot alle onderdelen werken zoals bedoeld.
De code refactoren
Nadat de functie om een map te openen klaar was, werd duidelijk dat de code te omvangrijk werd en gerefactord moest worden. ChatGPT blijkt die taak prima aan te kunnen wanneer je erom vraagt. Met een eenvoudige instructie om de code in een klasse onder te brengen en modulairder te maken, deed het precies dat. Het resultaat vormde een veel betere basis om de app verder te ontwikkelen.
You: can you refactor the code as a Class, ClipApp, to avoid the use of global variables and allow the app to become more modular?
ChatGPT: Yes, you can refactor the code as a class to avoid the use of global variables and make the app more modular. Here is an example of how you can refactor the code to a class, ClipApp:
import tkinter as tk
from tkinter import PhotoImage
from tkinter import filedialog
import os

class ClipApp:
    def __init__(self):
        self.root = tk.Tk()
        self.root.geometry("1000x900")
        self.image_files = []

        # Creating Frame
        middle_frame = tk.Frame(self.root)
        middle_frame.pack(pady=50)

        # Creating Image
        image = PhotoImage(file="./img/empty_file.png")
        self.image_label = tk.Label(middle_frame, image=image)
        self.image_label.grid(row=0, column=1, padx=50)

        # Creating navigate button
        previous_button = tk.Button(middle_frame, text="Previous", command=lambda: print("previous button pressed"))
        previous_button.grid(row=0, column=0)

        next_button = tk.Button(middle_frame, text="Next", command=lambda: print("next button pressed"))
        next_button.grid(row=0, column=2)

        # Creating Text Box
        text_box = tk.Entry(middle_frame)
        text_box.grid(row=1, column=0, padx=50)

        # Creating Ok button
        ok_button = tk.Button(middle_frame, text="OK", command=lambda: print("OK button pressed"))
        ok_button.grid(row=1, column=1)

        # Creating Cancel button
        cancel_button = tk.Button(middle_frame, text="Cancel", command=lambda: print("Cancel button pressed"))
        cancel_button.grid(row=1, column=2)

        # Creating main menu
        menubar = tk.Menu(self.root)
        self.root.config(menu=menubar)

        # Creating File menu
        file_menu = tk.Menu(menubar, tearoff=0)
        menubar
You: continue
ChatGPT: continue menubar.add_cascade(label=”File”, menu=file_menu) file_menu.add_command(label=”Open”, command=self.select_folder) file_menu.add_command(label=”Exit”, command=self.root.destroy)
def select_folder(self):
    folder_path = filedialog.askdirectory()
    print(f"Selected folder: {folder_path}")
    self.image_files = self.get_image_files(folder_path)
    print(self.image_files)

def get_image_files(self, folder_path):
    image_files = []
    for file in os.listdir(folder_path):
        if file.endswith(".jpg") or file.endswith(".jpeg") or file.endswith(".png") or file.endswith(".gif") or file.endswith(".bmp"):
            image_files.append(os.path.join(folder_path, file))
    return image_files


if __name__ == '__main__':
    app = ClipApp()
    app.root.mainloop()
In this refactored code, I’ve created a class ClipApp that contains all the code for the application. The __init__ method initializes the Tkinter root, sets the default geometry and creates the GUI layout, including the image label, text box, buttons, and menu bar. The select_folder() method is now a method of the ClipApp class and it no longer uses global variables. Instead, it updates the image_files attribute of the ClipApp instance. The get_image_files() method is also now a method of the ClipApp class and it takes the folder path as an argument.
This way, by creating an instance of the ClipApp class you can use the same code in different parts of your program, it also allows for a more organized and readable code.
Ook nu nam ChatGPT het grootste deel van het werk voor zijn rekening, al waren enkele aanpassingen wenselijk voor we verdergingen. Daarom gaf ik de bijgewerkte code opnieuw door, samen met de vraag hoe de modulariteit verder kon worden verbeterd. ChatGPT deed enkele redelijke voorstellen en voerde die op verzoek uitstekend uit. Soms stopt ChatGPT midden in een codeblok. Gewoon vragen om verder te gaan volstaat om ChatGPT de code te laten afmaken.
You: Here is the code with your changes and a few tweaks. Can you suggest further improvements to make it more modular?
import tkinter as tk
from tkinter import PhotoImage
from tkinter import filedialog
import os


def get_image_files(folder_path):
    image_files = []
    for file in os.listdir(folder_path):
        if file.endswith(".jpg") or file.endswith(".jpeg") or file.endswith(".png") or file.endswith(
                ".gif") or file.endswith(".bmp"):
            image_files.append(os.path.join(folder_path, file))
    return image_files


class ClipApp:
    def __init__(self):
        self.root = tk.Tk()
        self.root.geometry("1000x900")
        self.image_files = []

        # Creating Frame
        middle_frame = tk.Frame(self.root)
        middle_frame.pack(pady=50)

        # Creating Image
        image = PhotoImage(file="./img/empty_file.png")
        self.image_label = tk.Label(middle_frame, image=image)
        self.image_label.grid(row=0, column=1, padx=50)

        # Creating navigate button
        previous_button = tk.Button(middle_frame, text="Previous", command=lambda: print("previous button pressed"))
        previous_button.grid(row=0, column=0)

        next_button = tk.Button(middle_frame, text="Next", command=lambda: print("next button pressed"))
        next_button.grid(row=0, column=2)

        # Creating Text Box
        text_box = tk.Entry(middle_frame)
        text_box.grid(row=1, column=0, padx=50)

        # Creating Ok button
        ok_button = tk.Button(middle_frame, text="OK", command=lambda: print("OK button pressed"))
        ok_button.grid(row=1, column=1)

        # Creating Cancel button
        cancel_button = tk.Button(middle_frame, text="Cancel", command=lambda: print("Cancel button pressed"))
        cancel_button.grid(row=1, column=2)

        # Creating main menu
        menubar = tk.Menu(self.root)
        self.root.config(menu=menubar)

        # Creating File menu
        file_menu = tk.Menu(menubar, tearoff=0)
        menubar.add_cascade(label="File", menu=file_menu)
        file_menu.add_command(label="Open", command=self.select_folder)
        file_menu.add_command(label="Exit", command=self.root.destroy)

    def select_folder(self):
        folder_path = filedialog.askdirectory()
        print(f"Selected folder: {folder_path}")
        self.image_files = get_image_files(folder_path)
        print(self.image_files)


if __name__ == '__main__':
    app = ClipApp()
    app.root.mainloop()
ChatGPT: Here are a few suggestions for further improvements to make the code more modular:You can extract the GUI layout code into its own method, such as create_layout(), to make the __init__ method less cluttered and easier to read.You can create methods to handle the behavior of the buttons, such as previous_button_handler(), next_button_handler(), ok_button_handler(), and cancel_button_handler(), instead of using lambda functions in the button creation. This way you can more easily modify the behavior of the buttons in the future.You can create a method to handle the navigation of the images, such as navigate_images(direction), and call this method from the button handlers. This way you can easily add new navigation functionality without modifying the button handlers.You can move the functionality of the ‘Open’ button to a separate class that manage the images, this way you can further improve the modularity of the code.
Overall, by breaking down the code into smaller, more specific methods and classes, you can make the code more modular and easier to understand and maintain.
You: make those changes to the code provided
ChatGPT: Here is an example of how you can make the changes I suggested to the code you provided:
import tkinter as tk
from tkinter import PhotoImage
from tkinter import filedialog
import os


class ImagesHandler:
    def __init__(self):
        self.image_files = []
        self.current_image_index = -1

    def get_image_files(self, folder_path):
        image_files = []
        for file in os.listdir(folder_path):
            if file.endswith(".jpg") or file.endswith(".jpeg") or file.endswith(".png") or file.endswith(".gif") or file.endswith(".bmp"):
                image_files.append(os.path.join(folder_path, file))
        return image_files

    def select_folder(self):
        folder_path = filedialog.askdirectory()
        print(f"Selected folder: {folder_path}")
        self.image_files = self.get_image_files(folder_path)
        self.current_image_index = 0
        return self.image_files

    def navigate_images(self, direction):
        if direction == "previous":
            self.current_image_index -= 1
        elif direction == "next":
            self.current_image_index += 1
        if self.current_image_index < 0:
            self.current_image_index = len(self.image_files) - 1
        elif self.current_image_
You: continue
ChatGPT: Sure, here is the continuation of the code:
    def navigate_images(self, direction):
        if direction == "previous":
            self.current_image_index -= 1
        elif direction == "next":
            self.current_image_index += 1
        if self.current_image_index < 0:
            self.current_image_index = len(self.image_files) - 1
        elif self.current_image_index >= len(self.image_files):
            self.current_image_index = 0
        return self.image_files[self.current_image_index]

class ClipApp:
    def __init__(self):
        self.root = tk.Tk()
        self.root.geometry("1000x900")
        self.image_handler = ImagesHandler()

        self.create_layout()
        self.create_menu()

    def create_layout(self):
        # Creating Frame
        middle_frame = tk.Frame(self.root)
        middle_frame.pack(pady=50)

        # Creating Image
        image = PhotoImage(file="./img/empty_file.png")
        self.image_label = tk.Label(middle_frame, image=image)
        self.image_label.grid(row=0, column=1, padx=50)

        # Creating navigate button
        previous_button = tk.Button(middle_frame, text="Previous", command=self.previous_button_handler)
        previous_button.grid(row=0, column=0)

        next_button = tk.Button(middle_frame, text="Next", command=self.next_button_handler)
        next_button.grid(row=0, column=2)

        # Creating Text Box
        text_box = tk.Entry(middle_frame)
        text_box.grid(row=1, column=0, padx=50)

        # Creating Ok button
        ok_button = tk.Button(middle_frame, text="OK", command=self.ok_button_handler)
        ok_button.grid(row=1, column=1)

        # Creating Cancel button
        cancel_button = tk.Button(middle_frame, text="Cancel", command=self.cancel_button_handler)
        cancel_button.grid(row=1, column=2)

    def create_menu(self):
        # Creating main menu
        menubar = tk.Menu(self.root)
        self.root.config(menu=menubar)

        # Creating File menu
        file_menu = tk.Menu(menubar, tearoff=0)
        menubar.add_cascade(label="File", menu=file_menu)
        file_menu.add_command(label="Open", command=self.image_handler.select_folder)
        file_menu.add_command(label="Exit", command=self.root.destroy)

    def previous
You: continue
ChatGPT: Sure, here is the continuation of the code:
    def previous_button_handler(self):
        previous_image = self.image_handler.navigate_images("previous")
        self.update_image(previous_image)
        print("previous button pressed")

    def next_button_handler(self):
        next_image = self.image_handler.navigate_images("next")
        self.update_image(next_image)
        print("next button pressed")

    def ok_button_handler(self):
        print("OK button pressed")

    def cancel_button_handler(self):
        print("Cancel button pressed")

    def update_image(self, image_path):
        # code to update the image in the GUI
        pass

if __name__ == '__main__':
    app = ClipApp()
    app.root.mainloop()
In the update_image method you can add the code to update the image to the one passed as a parameter. In this way, you can use the same method to update the image when navigating between images and when changing the folder.
This way you can keep the code more readable, and if you need to change the way the images are handled you can simply modify the ImagesHandler class without affecting the rest of the code.
De implementatie van die ImagesHandler-klasse is best elegant. Daardoor kan de code ook over meerdere
bestanden worden verdeeld, wat ik handmatig deed. Vervolgens werkten we de functionaliteit verder uit door een TextHandler-klasse toe te voegen en
alle knoppen werkend te maken. Ben je niet tevreden met het resultaat, vraag dan gewoon om een ander antwoord of leg uit
wat er fout is en vraag ChatGPT om zichzelf te corrigeren.
Docstrings en typeannotaties toevoegen
Toen de app eenmaal werkte, wilde ik nagaan of ChatGPT ook documentatie en typeannotaties kon toevoegen aan de functies die het had geschreven. Dat werkte als een trein! Dat AI code kan schrijven is indrukwekkend, maar dat deel van het werk doe ik zelf niet met tegenzin. Documentatie schrijven vind ik daarentegen veel minder bevredigend. Dat ik dit (gedeeltelijk) aan AI kan uitbesteden, levert enorm veel tijdwinst op.
You: Take the first function and add type annotation and a docstring
ChatGPT: Here is the updated function with type annotations and a docstring:
def image_to_text_path(image_path: str) -> str:
    """
    Given an image path, return the corresponding text file path by replacing the extension with '.txt'
    :param image_path: The file path of the image
    :return: The file path of the text file with the same name
    """
    path, ext = os.path.splitext(image_path)
    return path + ".txt"
The type annotations indicate that the function takes a single argument, image_path which is a string, and it returns a string.
The docstring gives a brief explanation of what the function does, the inputs and the expected output.
It is a good practice to add docstring and type annotations to your functions, it will help you and other developers to understand the code better and avoid errors.
Op dezelfde manier liet ik ChatGPT een eerste versie van README.md schrijven. Die moest nog wat worden bijgewerkt, maar vormde een degelijk vertrekpunt waarmee een mens verder kon.
De app compileren
Python-code kan wat lastig zijn om te implementeren, maar het Nuitka-project probeert Python-code naar zelfstandige
uitvoerbare bestanden te compileren. Dit project is daar een uitstekende kandidaat voor, omdat het uiteindelijke programma dan eenvoudiger kan worden gedeeld met anderen
die afbeeldingen van annotaties voorzien om Stable Diffusion te finetunen. ChatGPT gaf de juiste instructies om Nuitka aan de
praat te krijgen. Het vergat echter het argument --enable-plugin=tk-inter, dat nodig is om de app correct te compileren.
nuitka --standalone --windows-disable-console --enable-plugin=tk-inter --onefile app.py
Unittests toevoegen
De laatste uitdaging voor ChatGPT is een kleine testsuite maken voor de ImagesHandler- en TextHandler-
klassen. Daarvoor kopiëren we de code van die klassen samen met de vraag om unittests toe te voegen met de Pytest-
bibliotheek. Er waren enkele nieuwe pogingen nodig, en je moet misschien expliciet vermelden dat ChatGPT fixtures moet gebruiken om minder
in herhaling te vallen. Voor eenvoudige functies met één duidelijk afgebakend doel (iets waar je bij het
schrijven van code echt naar moet streven) kan ChatGPT echter een redelijke reeks tests bedenken.
You: write unit tests for the code below
import os
class TextHandler: def init(self, text_path:str): “”” Initialize a TextHandler instance with a text file path :param text_path: the path to the text file “”” self.text_path = text_path self.original_text: str = “” self.load_text()
def load_text(self) -> None:
    """
    Load the text from the file, if the file doesn't exist, it will create an empty one.
    """
    if os.path.exists(self.text_path):
        with open(self.text_path, "r") as f:
            self.original_text = f.read()
    else:
        with open(self.text_path, "w") as f:
            pass

def save_text(self, new_text: str) -> None:
    """
    Save a new text to the file
    :param new_text: the text to be written to the file
    """
    self.original_text = new_text
    with open(self.text_path, "w") as f:
        f.write(new_text)
ChatGPT: Sure, here are some example unit tests for the TextHandler class using the pytest library:python
import os
import pytest
from text_handler import TextHandler

def test_init():
    text_path = 'tests/test_text.txt'
    text_handler = TextHandler(text_path)
    assert text_handler.text_path == text_path
    assert text_handler.original_text == ""

def test_load_text(tmpdir):
    text_path = tmpdir.join('test_text.txt')
    text_path.write("test text")
    text_handler = TextHandler(text_path)
    text_handler.load_text()
    assert text_handler.original_text == "test text"

def test_save_text(tmpdir):
    text_path = tmpdir.join('test_text.txt')
    text_handler = TextHandler(text_path)
    text_handler.save_text("new text")
    assert text_path.read() == "new text"
    assert text_handler.original_text == "new text"
In the above example, I’ve used tmpdir fixture from pytest to create temporary files. This allows to create test
files without polluting the file system and also cleaning them up automatically after the test.
In the test_init function, we test that the instance is correctly initialized with the text_path and the
original_text is empty string.
In the test_load_text function, we create a temporary text file, write some text to it, create a TextHandler
instance and load the text. Then we assert that the original_text attribute is the same as the text written to the file.
In the test_save_text function, we create a temporary text file, create a TextHandler instance, save a new
text to the file and assert that the text in the file is the same as the new text and the original_text attribute is
also the same as the new text.
Tot slot
ChatGPT opnemen in de workflow om een Python-GUI-applicatie te bouwen, bleek over het algemeen een bijzonder doeltreffende en efficiënte strategie. Het is wel belangrijk om te onthouden dat een stapsgewijze aanpak noodzakelijk is om grotere applicaties te maken. Er blijft een mens nodig om te controleren of de structuur degelijk is en de code werkt. Toch is een AI-copiloot die eenvoudige taken zo snel kan uitvoeren een enorme aanwinst. Laat ChatGPT gewoon de vervelende taken afhandelen, zodat jij je op het grotere geheel kunt richten.
ChatGPT kunnen inzetten om documentatie toe te voegen in de vorm van docstrings en typeannotaties is een fantastische mogelijkheid die veel tijd en moeite kan besparen. Het maakt het proces om code te documenteren veel sneller, efficiënter en aangenamer.
Omdat we nog maar aan het begin staan en ChatGPT pas enkele weken geleden is uitgebracht, is dit een technologie om in het oog te houden. Ze heeft het potentieel om heel wat banen in uiteenlopende sectoren te veranderen. Ermee kunnen werken kan in de nabije toekomst een grote troef zijn!
Vond je dit artikel interessant? Trakteer me op een koffie